Friday, January 30, 2015

Back home, progress on KP SW, card reader interface and vectrex console fix


NEW KEYPUNCH INTERFACE DEVELOPMENT

I was able to complete the changes to support punching 1130 simulator binary format decks and have most of the code done to handle the 3 Hollerith formats from the 1130 (029, 026 Fortran and 026 Commercial). I decided upon a change to display the actual characters for cent sign and logical not, which means a bit of conversion to Unicode - this is still to code.

I also tried to add a 'ruler' to let users determine the column in which a particular character on screen will be punched. I went through several approaches, including ToolTips and the Ruler Control, but at this point I want to place a semi-opaque strip window just under the current line of the file with tiny font indicating the column numbers. The code to turn it on and off by menu selection is working already.


QUICK BUILD OF BRIAN'S CARD READER INTERFACE

My parts were all here by the end of the day I arrived home, so I began construction on the interface that will drive my Documation reader to capture the existing card decks I picked up along with the 1130 systems.

I decided to use solder sockets and plug the chips in rather than directly soldering the somewhat rare chips to the board. Amazon should deliver the 40 pin and 28 pin sockets by tomorrow afternoon, a minor delay to avoid thermal damage.


DIGITAL GAME MUSEUM VECTREX CONSOLE REPAIRS

I am finding it very difficult to find the combination of the audio taper potentiometer, the right size flatted shaft, and a DPST switch on the back. The Vectrex is an odd design, in that the line voltage is hard wired to the transformer' the power switch only connects or disconnects the low voltage output of the transformer. I chose to put a power switch inline with the power cord, which allows reuse of the existing potentiometers since it is only the switch that is defective. The two switches should arrive tomorrow and I can wrap these up and hand them back to the museum.

DATACENTER SHED CONSTRUCTION

I left the shed under tension while I was away and it does appear to have modestly improved. Perhaps 10% of what is needed, but at least some progress. This weekend should be when I get back to fighting the shed into shape. 

Monday, January 26, 2015

Halfway through adding IBM 1130 Simulator support to keypunch interface

Traveling today from the west coast to Raleigh-Durham where I will spend the next two days with a client, coming home again on Thursday. I was fortunate not to be caught up in the blizzard affecting the northeast US.


NEW KEYPUNCH INTERFACE DEVELOPMENT

I started banging out code to deal with the 1130 Simulator formats when I ran into the realities of Unicode. I had naively expected characters encoded as 16 bit values, thus an 80 column card record would be 160 bytes long. Instead, I had to learn about codecs, encodings, UTF-8, various encodings used on Windows and other operating systems, and all the esoterica of handling strings with Unicode characters that are not part of basic ASCII.

In order to handle the files used with the IBM 1130 Simulator on Windows, it is necessary to deal with Unicode files, not simple ascii text files. I can't just substitute a regular ASCII character for the cent sign and logical not sign characters which Brian Knittel represents with U-A2 and U-AC. While these could fit in a byte, allowing a potential encoding that is still one byte per character, that wouldn't work for any Unicode character above U-FF.

The binary format for the simulator is much simpler - it is just two bytes per card column in pure binary. I just have to read it in fixed sized records instead of with a readline() function, then translate it to the ascii oriented standard binary encoding in this system. It is, however, yet a third way to do I/O that I must select depending on the users choice of encoding - codecs, ascii lines or binary fixed records.

The usual read and write facilities in Windows will return ASCII but for Python, they would throw an exception for values above basic ASCII (U-7F and below). I have no idea how Windows is encoding these characters in files and it seems that one can configure Windows to use different encodings depending on the localization, i.e. language, country, region etc. That means the only safe way to read 80 Unicode characters from a file is to use the codec module and tell it to use the Windows configured encoding.

It is possible get oneself into trouble easily when mixing ordinary (ASCII) strings and Unicode strings in Python, so I have to be careful to isolate all the Unicode handling away from the rest of the program. I only need to get things into Unicode just before I write them out, and on input I will immediately translate Unicode into my EBCDIC encoding in plain ASCII.

I am generating the code for this, then will give it a try with some files from the IBM1130.org simulator. Now working through the code making sure it works.

Sunday, January 25, 2015

Disassembled part of console printer, fixed vectrex game consoles, and moved forward on a few tasks

I had a pile of prep work to do in advance of my trip tomorrow morning, but did manage to get free by the afternoon to work on various parts of the project.

1053 CONSOLE PRINTER RESTORATION

I finally gave up on finding the spring by inspection, determining I would have to partially disassemble the machine to get to the bottom of the issues (and probably find the well hidden spring). I removed the operational magnets, a cluster of five solenoids that trigger space, tab, backspace, carrier return and index operations when energized.

Shift magnet on right and operational magnet assembly on left
I have incurred the need to set and check quite a few adjustments because of what I disturbed by removing the items, but if I can get to the bottom of the spring-mystery and take advantage of the access to further clean and lubricate it.

Interposers and other operatonal mechanisms now accessible
I looked at the motor pulley I removed from the printer due to corrosion, decided I might be able to clean it up enough to put on the Itel/Dura selectric mechanism instead of buying a new one. After a bit of scraping and cleaning, it looked serviceable. I tested it out manually by bending a new belt around the pulley to test whether the belt would push up a bit when the formerly bad grooves came around. It looks very good indeed which means this part will go back on the Dura.

With the operational magnet assembly removed, I could see the entire path of the mechanisms that trigger the various operations and get reset at the end of the mechanical function. I still don't see the spring but I should be able to discover where it is based on drag and sticking. I ran out of time before the trip but I am feeling like I am finally making some progress again.

Magnet assemblies hanging out of the way

NEW KEYPUNCH INTERFACE DEVELOPMENT

I did blast through the User Guide and update it to reflect the four IBM 1130 Simulator encoding types, but will hold off on touching the program itself until I begin traveling tomorrow. These encodings are the file types as used by Brian Knittel's IBM 1130 Simulator.

Those files are stored on the PC in Unicode in some cases, if they are in his default 029 keypunch format for card images, because his encoding uses two characters that are not in the plain ASCII character set, whereas I substituted one ASCII character for each of them. His binary mode is not a text file, instead packing the bits for each card column into a 16 bit word.

I decided to handle these by translating the IBM 1130 oriented files during reading into my program and when data is written out, so that inside the program and over the link to the KPgolem interface box they will be in my binary or EBCDIC modes. The keypunch interface box doesn't know about these or care, leaving the work to the PC program.

QUICK BUILD OF BRIAN'S CARD READER INTERFACE

All materials needed to build this are now on order or in hand. I plan to build it to fit inside the card reader controller box I built for my 1130 replica, since it grabs the wires from the Documation reader at this point, and to avoid the expense of building a separate enclosure and power supply.

REPAIRING VECTREX GAME CONSOLES FOR DIGITAL GAME MUSEUM

I had two Vectrex game consoles, early gaming systems, that had been donated to DGM but these two didn't work right. When turned on, we could hear the music and sounds of the game, which varied when the hand controller was operated, but the display had only a one inch long horizontal line in about the middle of the screen. I did some diagnosis, hauling out the oscilloscope and meters to narrow down where the problem lay.

I didn't have much time but I was able to find problems that I could test with a temporary replacement part - both screens displayed a full image which was excellent. I have to find a good replacement that is as consistent as possible with the original part. One of the two machines is working perfectly, needing only the last permanent part replacement to wrap this repair up. The other didn't look right to me, which means I have some more diagnosis to do next week.

Startup screen of the console
Game operation

Some game graphics - vectors

Saturday, January 24, 2015

Fighting the shed alignment, hunting lost springs and building a card reader interface

1053 CONSOLE PRINTER RESTORATION

I put in a good two hours examining the mechanism, hunting, testing linkages. I still have odd behavior with the space button and part of the carrier return release is not working all that well, which could be a trapped squished spring in the works. This is so tedious and time-consuming but it will be essential to use the console printer.

QUICK CARD READER INTERFACE FOR READING DECKS

I decided to quickly build a version of Brian Knittel's Documation interface to PC, as that would involve almost zero design or debug time, The aim was to get the fastest time to digitizing card decks. The design uses a couple of out of production chips, but I lined them up and expect them by the end of next week.

I already have the cable wired up to my interface to the replica 1130, which means I can piggyback on the wires in the box rather than having to wire up the complex multipin connector used with the reader.

All the prices of the components seemed quite modest until I came to realize that getting the code onto the SX microcontroller chip requires a SX-Key or SX-Blitz module, or supporting a complex protocol I would have to design for and debug just to program the EEPROM on the controller. The processor itself is under $2. The SX-Key module to program it - $60. Argh. Bit the bullet and ordered it. Perhaps I can sell it on ebay or elsewhere to recoup part of my money. I don't expect to program this obsolete family of controllers, that are long out of production, ever again.

My first few reading tasks will be the ECAP program that a fellow 1130 enthusiast wants to run on his 1130 emulator, some line printer art decks I have since these have wide applicability for retro computing fans, and then some 1130 system software decks.

NEW KEYPUNCH PROGRAM

I want to support the file formats of the 1130 simulator, which adds a bit of complexity for the ASCII encodings. The binary format is easily converted into the KPgolem binary notation, but the ASCII based files can be in one of three encodings, called 029, 026Fortran and 026Commercial. None of these are exactly aligned with BCD or EBCDIC.

The interesting difference caused by the format is the inclusion of extended ASCII characters for ¬  and ¢ where I used ^ and [ to represent them. The files will have to use 8 bit ASCII, which is not transmissible over the link to KPgolem given its restriction to 7 bit ASCII. Not a problem, as I can map the 1130 formats to my encoding for punching, while retaining the other characters for screen and PC file use.

I am kicking around the exact way I want to support this, before I start coding. It will be a good thing to work on while I am on my business trip to the east coast next week, while I can focus on physical objects tomorrow.

DATACENTER SHED CONSTRUCTION

My first shot at using a winch to pull the shed sideways into better alignment didn't work - the nylon strap sat across the roofline, since I could only find a natural place to hook up at the far side roof overhang, but winching downwards put so much friction on the tape on the roof that the downward resistance dominated the leftwards resistance of the shed. No movement.

I have to find a good attachment point on the shed and a good anchor point for the winch. Nothing obvious presents on the shed, but I do have a pipe secured in cement which had previously held a Dish Networks antenna years ago when it was the only way to get Internet connections faster than dial-up.

The pipe is about four inches from the side wall and ends about five feet off the ground. Not ideal, as there isn't much room to pull the shed till it abuts the pipe and there is a big downward angle if I hook to any part of the roof. Some contemplation required.

The shed is a few inches from the property line fence, which would be the right place to stick in a lever and push the shed away from the fence, except that the fence is a bit delicate and wouldn't stand up to the forces necessary. No room to put something on the ground, angling up to push against the building because of the tight clearance.

The other side, where I have to pull instead of push, has the metal pole a few inches away, but overall there is a reasonable amount of space between the shed and the wall of my house. I don't have a good point for anchoring anywhere on the Stucco wall of the house or the roof overhang.

I will try to mount a board vertically behind the pole, using a few clamps, with it extending far enough up to allow the nylon strap from the left side of the shed to stretch up to its ratchet without having to touch the rest of the shed roof. I will have to use a ladder to get up to where I will connect and operate the ratchet.

Once I tried to set the board up, I found that my roof overhand and gutter are in the way. I can extend the pole up to just under the gutter, which doesn't fully keep the nylon strap off the roof but improves the angle a lot. I set it up as best I could given the constraints.

The mast is bent over to touch the roofline, however it appears to have made no difference to the fit of the doors. The pivot for the doors is in the floor tile on the bottom and in the gable on the top. The pivot points on the floor plate are to the right compared to the openings in the gable.

Since the walls snap down into a slot in the floor plate, it seems to me that the left-to-right alignment of the floor tile is not firmly determined by assembly. It seems to be more a matter of random chance as the shed is assembled. I can see from the fit of the gable to the front left and front right wall panels that the line under the gable including two wall panels is skewed leftward.

If I can find a quick and dirty way to correct the doors, I would apply it in a heartbeat. The shed seems fine except for the terrible fit across the front especially the doors.

If I had a board about 80" long I could use a floor jack with the board to twist the lower left and upper right of the doorway, pushing the gable rightward. Of course, I don't have anything on hand that is close enough. I will wait for inspiration. 

Finalized documentation of keypunch interface

NEW KEYPUNCH INTERFACE DEVELOPMENT

I finished up the User Guide and uploaded it along with the latest version of everything to the KPgolem site on Github. I also made videos of binary mode punching and of reading a few cards to show those capabilities, which I posted to YouTube.

Link to video of punching binary mode

Link to video of reading cards

All that remains is to clean up the condition of my 029 keypunch and to work with my fellow keypunch owners to have them wire up their machines and build their boxes too.


Friday, January 23, 2015

Polishing up the keypunch interface software and documentation

I visited the Computer History Museum mid-day Wednesday to meet with my fellow 1401 restoration team members, on top of a full day of job-related tasks, but did find a bit of time to put into the 1130 restoration anyway.

At CHM, we finally made progress on a troubling intermittent problem with the 1402 card reader on the 'Connecticut' 1401 that intermittently throws off reader checks. While most of the work in past weeks has focused on mechanical parts and adjustments in the card reader, we traced the issue to spurious additional read pulses issued by the 1401 processor that confuse the reader which has not yet completed a read cycle from the initial pulse.

This was clearly coming from the processor, but the ultimate cause is not yet nailed down. We traced the signal problems back further and further into the machine, but had to stop work when it was time for the scheduled demonstrations of the systems at 3PM. When we next work on the machine, we can trace further back to see what is causing the problem.

We see that the processor, which should be resetting the read command trigger once the cycle begins is occasionally staying active for extra cycles, long enough for the processor logic to emit additional read pulses to the card reader.

Work was extremely heavy on Thursday - never got into the garage today.

NEW KEYPUNCH INTERFACE DEVELOPMENT

I created a punched card as an icon and assigned that to the program. I then shot a short video of the program operating and punching cards, which I uploaded to YouTube and cited in the project on GitHub. Finally, I wrote more in the User Guide, part of the interface box protocol and some of the reference information such as encoding data that users will need.

Two cards punched by the demonstration on the YouTube video
   The video is here: New keypunch interface punching cards from a PC file

I spent the evening Thursday updating the User Guide and polishing the code. I had found a small problem with reading cards - which worked fine but the resultant file had spurious carriage returns added, thanks to Windows intervention behind the scenes. I made a tiny change to open the output file in binary mode, even though it is a text file containing only ASCII, because that disables the unwanted conversion of the end of line.

I spoke with one of my collaborators on the keypunch program, deciding whether to change the BCD encoding to include more BCD characters, such as Word Seperator. The main use of this mode will be the CHM accessing files they already built, which makes this a legacy compatibility mode. As such I won't extend BCD mode. If other characters are desired, they can be added on the fly using the _LOAD commands to the interface box before punching a deck that includes the additional characters.

Wednesday, January 21, 2015

Program testing finished for PC side of new keypunch interface

NEW KEYPUNCH INTERFACE DEVELOPMENT

I worked through a few minor issues, such as a hangup in one of my dialogs between the program and the interface box, where I had temporarily changed the interface box to send a specific message to the programming USB port, not the serial port; my PC code never received the confirmation message.

In another case, I added an extraneous character to a command that would be sent to the keypunch interface box, which caused a few behavioral issues. I was lucky to have a particular card in one of my test files on the PC which was maximum legitimate length, pushing the entire command line over the limit and triggering an error message from the KP interface box. Also it was fortunate that I had a diagnostic print showing me the messages being received by my program, allowing me to see the message.

I added a logging system, a hidden window collecting status that the user can make visible with a menu command. The wxPython implementation does not match the wxWidgets documentation, which claimed that the logging command LogGeneric took a format string and then a set of parameters as needed to complete the string (such as %d to include the parameter as a decimal number). However, it actually uses a single string which must be formatted separately if parameters are to be folded in.

The keypunch itself is still a fussbudget and unreliable, which hampers my testing when I run into misfeeds from the hopper, jams in the punch station or similar issues with the machine itself. I am not seeing a release activating at the end of every card, which I think is a dirty relay contact problem in the 029.

In spite of the 029 issues, it punches binary and regular (BCD or EBCDIC) cards well, it is easy to pause and go to a specific card number in file to resume punching. The reading function worked well, to the extent I could nurse the physical keypunch to behave.

Nonetheless, I will release the software as a beta version now, so that my partners at CHM and other places can build and begin testing with their own machines. As soon as there is a more reliable 029 wired up with the proper cables, I can move the interface box over and test at volume. Or, I might be able to convince this keypunch to work more reliably.

I put in the time to sort out the problems using pyinstaller to create a single executable file to send around. There were a few, but essentially the way that my Canopy python system has wxPython installed caused the problem. First I had to learn that by creating a console version and reading the error message when the program tried to start. Then I fixed the python issue.

My new 3.0 version is installed the new way, a level down in the site-packages, allowing the wxpython.pth path file or wx.version program to select among the wx-### directories that have the wx folder inside for their respective ### version. However, the older version in Canopy was as a wx folder directly in the site packages, which caused it to be fetched in spite of the path file, unless I used the wx.version in my program.

Next issue, pyinstaller doesn't understand wx.version and fetched only the direct wx folder, which was the wrong version, causing my program to fail. I created a dummy wx-### folder for my old version, them moved the wx folder into that one. Now, the system correctly uses the path file and more importantly, pyinstall bundled the right files.

Github is up to date now, other than the remaining documentation I need to create and post. For now, this will be put on hold until I have a more usable keypunch and/or receive problem reports from beta testers. I did spend the evening writing up the User Guide, finishing the PC program portion.

Tuesday, January 20, 2015

Debugging of completed PC software for controlling the keypunch interface box

NEW KEYPUNCH INTERFACE DEVELOPMENT

I finished all the coding and debugged everything possible without the keypunch connected. I uploaded the alpha level code to GitHub to allow others to look it over. I then attempted to build a windows executable to make it easy for other project members to download and run the program without having to install Python or the various packages I used.

I did get pyinstaller on my system but the executable it produced vanishes without throwing up a GUI. I need to rebuild it with a console window and debugging, to see what might be wrong, but this is not a priority so I put it aside in order to resume testing.

At that point, I moved out to the workshop, hooked up the 029 keypunch and began testing the connection sequence and other communications between PC and keypunch. I found a few flaws and began correcting them, as well as adding some additional diagnostic output to help until I see that the communications mechanism with the keypunch works correctly.

One example of the bugs is that the Arduino returns \r\n for every line, carrier return followed by new line, while we were looking only for the newline at the end of a line. Now we drop both the terminating characters if it is CR NL, otherwise just the NL.

I ended the evening with solid communication between the keypunch interface box and this program, leaving me the opportunity to try out one test output file which I put together for the purpose. It punched properly except I was off by one on the card being punched (due to origin 0 used on the language arrays but origin 1 used for human counting of cards in a deck).

I had a few other small errors to work on, but I do see that the essence of the program is correct. I discovered some odd characters in the stream, which turned out to be XON and XOFF flow control characters, because I forgot to put my pySerial port into software flow control mode where it would strip these out automatically.

I will do some cleanup and resume testing tomorrow, when I hope to be able to deem it ready to release as a beta version. I had made a few minor improvements to the Arduino code as well, which I should also upload to Github.


Monday, January 19, 2015

Keypunch interface PC side software coding almost complete, ready to start 029 testing


NEW KEYPUNCH INTERFACE DEVELOPMENT

The software to run in a PC, connected by serial link to the KPgolem interface box in order to drive a keypunch, is fairly complete for all aspects except the portions that send and receive over the serial port. Its user interface is solid and it handles input and output files on the PC well.

Python with its regular expression capabilities makes the extraction of status easy, since the protocol over the serial link is purely in ASCII, equally easily grasped by humans and programs. That was one of the design objectives which makes the programming of the interactions in this software simple.

The language of the protocol is well defined for what the PC sends to the interface and the responses have a few locator beacons, sequences such as 'OK' that can be detected without having to care about the exact format and contents of the rest of the incoming stream to the program.

All interactions are simple transaction pairs - a command sent from the PC to the interface box, which sends back information including confirmation of success, notification of errors, and other data solely based on the command the PC issued. When not responding to a command, the interface box does not send any messages towards the user (PC program).

Serial streams are simply a sequence of characters coming over the link, requiring that the protocol and software establish message boundaries since we think in terms of a command string or line and some response strings/lines coming back. We can receive a line across multiple bursts of serial transmission - getting a part of the line in the first burst, for example, some more in a second burst, then getting the rest of a line plus data from the subsequent line arriving in our third burst.

The program must extract data from the serial link as it arrives, building up a message until we see the characters or conditions agreed upon as a message delimiter. If some data has arrived for a subsequent message, it should be saved while we act upon the one complete message we have aggregated.

There is very little buffering in the serial link hardware on either side, so data must be read out of the port as rapidly as possible, lest the incoming data flood in overwriting some earlier characters before we can read them. The link uses flow control, the characters XON and XOFF (defined ASCII characters) are sent by each side to request the other side to hold off sending more data, then releasing the other side when we have free up room in the serial port buffer.

The keypunch interface box mainly uses this to hold off the submission of new commands until it has consumed its buffer of incoming data and completed those commands. We can send XOFF from the PC if we are slowed down handling the incoming status messages from the keypunch, but its granularity is an entire message at a time, not character by character flow control. Thus, both sides use flow control on big chunks or groups of data. It wasn't worth the trouble to add large buffers and threaded server processes to build fine grained flow control.

By the end of the evening, I had almost all the code completed but not yet tested. The only steps left (beyond debugging) are to call the keypunch connection dialog at startup, and to put in the top level loop which will call my functions that issue the punch or card read commands to the keypunch interface.

The code issues plenty of diagnostic status messages on the bottom status bar portion of the user screen, both error conditions and some progress indicators at startup. It watches for indications that cards are not registered when we are trying to punch or read each card, flashing the not-ready condition and request to register the cards in the status pane area.

Sunday, January 18, 2015

Mostly worked on the PC software for the keypunch interface

1053 CONSOLE PRINTER RESTORATION

Still looking for that spring I believe is lost and stuck somewhere inside the Selectric mechanism. I have to locate the spring to be sure I haven't left the part inside potentially jamming or damaging the console printer at some later point.

NEW KEYPUNCH INTERFACE DEVELOPMENT

I got my scrolling window for the card images working, plus my status bar on the bottom works correctly. I have added in some more error checking as well, so that one doesn't open a file when another is already open, or close a file twice.

I have begun making the interface better esthetically, although the real challenge will be ensuring that resizing retains the behaviors and appearance I want. As well, I have adjusting to do that deals with the longer lines of binary mode files. Resizing is working fine, but it may not work as well with radically different screen resolutions because of changes in the pixels required for a font character as the resolution changes.

Sadly, since fonts are selected by points or picas, meaning fractions of an inch, the higher the resolution the more pixels that are contained in that same fraction of an inch. The rest of the settings are all relative to each other and should scale proportionately at various screen resolutions.

I need to switch my font to a monospaced type in order to control the alignment of the visible card columns on the screen. The resizing, at my current screen resolution, is working quite well now.
After I get the GUI to a better state, I will turn to the state machine for communicating over the serial link with the keypunch interface, the last major part of the program left to go.

Other GUI functions such as moving to a different card number in an open file is working now. Still some minor GUI issues but

DATACENTER SHED CONSTRUCTION

I loosened all the bolts holding the roof panels to the trusses and side walls, hoping to get it twisted closer to ideal alignment now that all the plastic panels have been held in approximately their proper shape for a week. I saw a significant improvement along one side of the roof-line, in many cases perfectly aligned now. The other side is still off, particularly the two front panels on the left side as you face the entrance to the shed. They are twisted, the sidewalls on both sides at the front are leaning leftward, all of which keeps the front gable leftward of its counterpart holes on the floor.

I suspect I will have to use a winch and put some serious tension on the left front side at the top, skewing the parts to the right where they need to be. I will tighten down all the screws in the roof panels for each section that has come into alignment - those parts will help pull the remaining few components, hopefully with lighter and lighter tension.

I did drill and screw down the right front corner of the shed floor to the platform, but won't install the other three lag screws until I have untwisted this enough to use the swinging doors. 

Saturday, January 17, 2015

Delays and distractions but continuing to add to PC software for new keypunch interface


My bag wasn't delivered until 2:30AM, with a full day at the client afterwards. I didn't get to the project at all Wednesday, but did work on the code a bit during the flight home Thursday morning. My father in law, who was gravely ill, passed away while I was flying and I spent the day with my wife and daughter, not the 1130. Friday had quite a few calls that were deferred from when I was on my trip, but I did get back to work for some time later in the day.

NEW KEYPUNCH INTERFACE DEVELOPMENT

I worked way at understanding and implementing the GUI elements to give me a scrolling window showing the card images, status information along the bottom, plus the behavior I needed. Some of the requirements or functions were a bit obscure, needing experimentation and reference to sample usage by others.

I was able to get the card file for punching to display in the window and some scrolling behavior, but it has some issues remaining. It is displaying the card images of a BCD or EBCDIC encoded file when I open the file, but the spacing is off. Worse, I can end up with artifacts as parts of the image are not erased as they should be before I update the screen. These are relatively minor issues that will just take a bit of time to clear up.

I discovered along the way that my Python implementation already had an older version of wxPython installed - which was the default when I did an import of the module - since that version was lacking the improved scrolling window class I was referencing. I learned how to override my code to pull the newer version of wxPython.

Wednesday, January 14, 2015

Substantial work on keypunch interface PC program during my flights

I flew from California to Raleigh/Durham North Carolina today. While I flew I was able to put in some work on the keypunch interface, in between doing my day job. Heavy fog in San Jose delayed my departure by 45 minutes - the aircraft couldn't see the runway centerline to take off nor enough of the perimeter to taxi safely. That delay, plus a complete circumnavigation of the perimeter of Chicago O'Hare before reaching the gate gave me just ten minutes from when I dashed off one plane until they closed the doors on the second flight.

I had only four gates separating inbound and outgoing aircraft, so I made it aboard. My bags did not. The next flight arrives at midnight and if I am lucky will have my bag ready for delivery to the hotel. If not, I will have no new clothes and no suit for my speech to a roomful of senior execs of a client company, plus the bag will have to chase me around to another hotel and perhaps back to home.

NEW KEYPUNCH INTERFACE DEVELOPMENT

I figured out how to save and set up the encoding option when the program restarts, thus the program retains the last used code, which is a productivity feature for users as they will tend to operate mainly on one type of file. For example, at the CHM it will mostly be BCD encoding that is used, while I will use either 1130CARD or EBCDIC for most decks.

Next up was resolution of the layout that will allow my main window to have a status bar along the bottom. I then built the fields in the bar to display current status and error messages. This is pushing my understanding of the hierarchy and linkage of the various windows, panels, sizers, widgets etc but I am working through it. I did develop a proper understanding but the coding is a bit tedious for all the information I want to pack into the status bar. I didn't get it completed tonight.


Monday, January 12, 2015

Data Center shed fought me to a standstill getting the doors even

I was able to wrest a little time today to work on the 1130 project, while wrapping up details for my trip starting early tomorrow to Raleigh. At least I can work on the PC code while away, although I won't be able to do any testing that requires the keypunch and interface until I get back.

I have a board meeting tonight as well, leaving me no time to work on the project when it gets dark.

DATACENTER SHED CONSTRUCTION

Shed before it was moved into position - edge of platform visible below shed b
The back of the shed was quite a bit off after finishing the roof construction but we shoved it all into alignment. Unfortunately, the two doors are not even and the methods provided by the manufacture, shims under the edges of the platform, have essentially zero effect.

Shed is warped, top and gable need to move to right in this view
I loosened up the screws holding the front gable, into which the door pivots attach, but can't move it to the side without quite a bit more torque on the entire shed to twist it and the roof enough to swing the top of the doors over to the right so they are more directly over the bottoms of the pivots.

I imagine this is going to take a winch or some big wood levers to push the gable to the right, not something I can easily do today. This will have to wait until I return later this week.

Not much room at rear of the shed
Even less room along the right side to the property line fence

Filling out the PC side software to drive the keypunch interface


I have a business trip to Raleigh that begins on Tuesday, but required quite a bit of preparation of the material I will present. I spent a lot of the day today doing work, not restoration work.

NEW KEYPUNCH INTERFACE DEVELOPMENT

I put in a substantial amount of code on the user interface and basic function of the PC side software to drive the keypunch interface box. Marc Verdiell suggested that the software remember which serial port was last used to spare the user from repetitively selecting at startup. I added a configuraton file (KPinterface.ini) which tracks the serial port as well as the last encoding the user picked (BCD, EBCDIC, Binary, etc).

The program will now successfully open files for punching and validate the contents. It reads through, checking that there are no characters in the file that are not valid under the encoding in force. It ensures no card is longer than 80 columns and it validates the format of the binary mode which consists of groups of four hex digits for each column, separated by a space.

Obviously file input/output is working, since I pre-read the file before any punching will occur. Since I do the validation, I will know the total number of cards, which allows me to set up the scroll bars to move through the cards.

DATACENTER SHED CONSTRUCTION

I still haven't shoved the shed to the right spot on the platform - it is close but I am not satisfied. Once that is done, I have to shim one side of the front wall, which is how the swinging doors are adjusted to be level with each other and the floor but not before it is in the final place. The lug screws that will anchor won't take more than ten minutes to install. The only thing I really need is some time with my son-in-law to do the shoving and tugging to get it aligned on the platform. 

Saturday, January 10, 2015

Shed finished except for bolt-down to platform, keypunch interface PC software development and a bit of 1053 console searching for the fabled lost spring

1053 CONSOLE PRINTER RESTORATION

I spent another hour digging through the Selectric mechanism in search of the dropped spring. I know it is interfering with the tab and space interposers, but even with that clue I can't find it yet. Very diabolically hidden deep in the mechanism but if I disassemble enough to see everywhere I will have a ton of adjustments I have to make when I reassemble it.

NEW KEYPUNCH INTERFACE DEVELOPMENT

As of lunchtime, I have my startup dialog box that allows the user to pick the serial port working properly and the port open for reading/writing. The main window is open has stub menu items and lacks the status bar where I will display key information. I can't quit get the code right to position the status bar at the bottom and still see the main window with scroll bars where the cards will be displayed.

I temporarily disabled the status bar while I built out the code to open or create disk files, read/write them and display the card lines in the window. A validation routine will check the files to ensure that lines are not longer than 80 columns and that the ASCII characters in the file match the encoding method (e.g. BCD or BINARY).

Here is the UI so far - it begins by throwing up a dialog box showing the available serial ports and requesting the user to select one. That port is opened and communication with the keypunch will be established.

Opening dialog box to choose a serial port
The main window has three menus - File, Action and Options. Options allows selection of the encoding of ASCII characters to card hole patterns. In addition to the BCD, EBCDIC and Binary supported by the interface box, I added two modes that work with the IBM 1130 Simulator program written by Brian Knittel.

Main window (no file open at this time)

Options menu to select the encoding of the ASCII text file
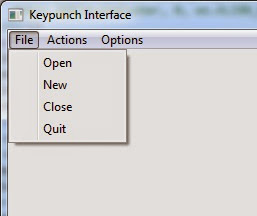
A file to punch is opened by selecting the File-Open item, navigating to the text mode ASCII file (suffix .txt). If a deck of cards will be read in by the keypunch, File-New is selected and a new file of the users choice is created. File-Close will close the file, allowing the encoding to be changed or a different file to be punched or read into.

File menu
When a file is opened, it will display in a window with scroll bars,  the first card on top. If a new file is being created by reading cards on the keypunch, those cards will be appended to the file and appear at the bottom of the scrolled list. One of the Action menu entries is Goto, allowing the user to move to a specific card in the deck which becomes the starting point for further punching. This way selected cards can be repunched if there is a problem.

File open dialog box to select a file that will be punched onto cards
File save dialog to create a file that will hold cards that are ready by the keypunch
The Action menu also has Start Punch, Pause Punch, and Stop Punch. When a punch file is loaded (thus visible in the main window), selecting Start Punch will cause the keypunch to punch each card in sequence on the keypunch. Selecting Pause Punch will temporarily stop the program from punching additional cards, but it can be restarted at any time by again selecting Start Punch.

Actions menu that controls punching, reading and the current card position in the file
Stop Punch is used to stop punching a deck even though there are more cards in the file, but it also is the signal that a deck being read on the keypunch is complete. It is issued after the last card is read.

The encodings selected by the Options menu are used to do validation on the file to be punched. The checks will include:

  • Card is not longer than 80 columns
  • Only characters that are valid in the selected encoding are in the file
The Status Bar at the bottom of the main window will display things such as the current encoding, the number of card images in the current file, the current card to be punched from the file, and the status of the keypunch. 


DATACENTER SHED CONSTRUCTION

The roof caps were also warped and amplified any twists that existed due to the warped roof panels I installed yesterday. I was able to get the first 2/3 of the roof line installed with a lot of wrestling, but the degree of twist at the rear is just too much to do solo. Once my son-in-law has some spare time, I can get those full screwed down. They are sitting partially installed right now.

I put on the front two skylights and installed the two sliding windows, so once I get the caps and their skylings resolved, the shed is essentially done. It has to be jockeyed into final position and bolted down to the wood platform, which includes shimming the front so the warped doors close properly, otherwise there is nothing left to do.

Skylights installed in front part of the shed
Warped roof cap along bottom

Joint won't pull together due to warping
It turned out to require a very heavy duty, wide jaw clamp I use for making furniture. I was able to squeeze, slide and twist the panels simultaneously by forcing the key joints together. These were each formed by a roof panel and two roof caps, meaning all three elements had to align adequately to get the screw to bite at the right spot. With the clamp, I finished up the roof caps and installed my remaining skylights.

Clamp used to pull the warped panels together in order to screw them together

Now that I have it closed up, I just need to shove it into final position, shim the edges to make the doors level and sink four lag bolts down into the wood base platform. Those are the only steps left for completion of the shed itself.

Gap in floor panels, hope to minimize this as I shove the shed into final position
I will put some paper down and wait until after we have a good rainy day, just to see if I have any leaks or drips. It is designed to have open air flow, with screened vents in the front and rear gable, and is certainly not air tight, so I need to know what kind of water entry I might get.

I can turn my attention to lighting inside, installing the weather proof outdoor 220V receptacle on the side of my house, and building a cord that will snake out of the shed and be plugged into the receptacle on those days when I want to run equipment in the shed data center.

I have to figure out a ramp to use when I roll the 1130 machinery up into the shed, but that won't be needed until the restoration is complete. I will move the keypunch and the punched cards and disk drives into the shed, since I rarely access them now, but those can be lifted up to the shed floor. 

Roof installed on shed and user interface coding for keypunch PC software

NEW KEYPUNCH INTERFACE DEVELOPMENT

I spent some of the morning reading about the wxPython GUI and most of the late afternoon and evening coding up graphic elements like the main window, menus, dialog boxes and controls. I have completed a design for the UI and will work on building it out in the coming days.

I included pictures and references for the parts that are used to build the interface box, making it easier for other people to make their own interface to use with other keypunches. I will work with a few local people as they build their own boxes and wire up their keypunches.

DATACENTER SHED CONSTRUCTION

The warped roof panels are as troublesome as I expected - extremely so - as I try to get the shed roof in place. They twist in several dimensions, for example. When the section that sits on the top of a well is bowed upwards - the usual direction which makes me think this is the result of tensions in the plastic piece based on its design - I can get a few screws in but the final edge bends up with so much force I can't bend it down while trying to get the screw up to the hole in the roof panel.

The idea of HPDE, very tough and durable, appealed to me when I bought the shed kit, but my tacit assumption was a competent design and decent quality control so it actually could be assembled. I also assumed it would give me temperature and humidity control benefits. In hindsight I should have bought a lot of lumber and built a wood shed instead of relying on a prefab. Too late now, so on with the long and painful battle to beat this shed into completion.

My son-in-law worked with me in the afternoon to pull down, twist, shove and bend the panels until we had them all installed. It was quite a job but now there are only a few remaining steps. I have to install roof caps that form the ridge of the roof, with plastic skylights along the line, two plexiglass windows and anchor the shed to the wood platform. There is just a small pile of parts left and it should be complete tomorrow.

I took some pictures in the dark, because I forgot to do this during the day. The inside picture gives a good sense for how the data center will look, sans the overhead lighting and of course computer equipment.

Inside after roof panels installed - the basic data center space
Night time view with roof panels finally installed

Friday, January 9, 2015

Shed construction progress, now installing roof panels, plus software work on keypunch interface program for PC

NEW KEYPUNCH INTERFACE DEVELOPMENT

I made the decision to use the wxPython module with the PC application I am writing, which provides a Python interface to use the wxWidget library which is a set of C++ classes to build and operate a GUI, including on Windows.

I did a bit of studying to understand the basics of the toolkit and will begin wrapping that into my code. It is higher level and more 'Pythonish" than the windows API itself or some other GUIS. The alternative GUI module would have been based on TCL/Tk, which would add a second interpreter and two more languages for coding. Even though I did some work with TCL and with Tk for GUIs about fifteen years ago, I didn't want to add the re-learning curve to the other costs of this part of the keypunch project.

The learning curve is certainly steep enough. I am using Microsoft Visual Studio, with Python installed, several packages, including pySerial and wxPython. I can't seem to get the wxPython to be recognized and used with Python 3.4, so I will try to put it on Python 2.7 for which it is known to work. Due to unfamiliarity, at each error message it takes a while to understand what is being said, where the problem is, and how to apply a fix at each level of the software (from VS to Python to the installers to the package to my code.)

I have the packages installed on Python 2.7 and working, but am at a very early stage of building up the GUI. I have a bit of design work to do now, thinking about how it will work, what controls are needed, etc.

I collected some pictures of the components and construction steps of the interface box, which I will use to update the construction manual.

DATACENTER SHED CONSTRUCTION

The last piece of flooring continued to be extremely difficult to get to interlace with the remaining tiles. I tried to reverse bend the flooring to remove some of the wave that is in the end that causes the problems. I also have a wave in the installed tile end that this piece will mate to, which might require unbending of that piece as well.

Finally, I decided I had to cut most of the tabs off of one side, since it absolutely refuses to go together. I will depending on the anchoring of the floor to the platform that will take place later as a way of holding these together, as well as the wall panels which will provide some paltry support.

Cutting off the tabs that refuse to interlock
All it takes is one section of the job that is impossible to do as "designed" to sour my opinion of Lifetime and their HDPE plastic sheds. I will get this together but the design is not at all tolerant of any bend the parts develop, and the video for additional help on this step is no more than the two sentences in the manual - push them together at a 45 degree angle to interlace the tabs then lower.

I also found the references to screwing the panels together through the 'divots' in the floor made sense only when I viewed the video and saw entirely different flooring, which had clear round depressions for the screws to enter, but there is nothing at all in the panels included with my kit. Stale instructions, changed parts. Obviously no QA assembly of the kit was done after the change (or nobody paid any attention to the mismatch between the manual and the divot-less tiles).

I can't believe this hasn't happened to other customers. I recommend against buying any of their products based on this. Otherwise I had a bit of bashing that was necessary to put the hinge rods into the doors (which also had developed a bend), yet everything else was well designed, fit together nicely and was well documented.

Whether the bend developed when they were trucked (since the shed was about a half ton weight in its two boxes) or while the panels were stacked waiting for the platform to be built, this is a problem with the parts. I did comb through the manual to see if there was any mention at all of preferred ways to stack them, on the assumption that 100% of the bend happened here on site, but there is nothing anywhere in the manual or on their site that suggests they could be warped by how they lay.

Once I had thoroughly removed the tabs from all but the two on each side, I got the pieces to lay in proximity allowing me to continue installing wall panels. There is a gap in the middle, but I can fight that together later. I then installed the rear and remainder of the right side, getting me to about 60% completion, before I took a necessary exhaustion break.

After lunch, I returned to the shed and finished up the walls. In a few places the wall section was very balky, requiring a lot of wrestling and occasionally some heavy banging with a rubber mallet. Once they were all in place, some shelves got installed. I had to rest for a while before I began on the doors and front gable.

The process of installing the doors is very tough to do without two other people helping. Six foot tall doors are pushed into a plastic foot, but there is nothing to hold the rest of the door up or in position. One fell over, twisting the plastic over 120 degrees as the top of the door bent down to the ground. With the door teetering on its rod at the bottom, you need to lie down and push a cotter pin through the rod and plastic foot.

If you get one done, you are then installing the second door in the same way, while the first door is still teetering without support. Hard to hold two doors up while pushing a cotter pin through the second rod. It gets worse. You then have to lift up the front gable and lower it onto the rods of the two doors (which are still teetering). Even when it is attached to the doors, nothing holds the gable or the doors so the entire assembly wants to twist 120 degrees to lie top down on the ground.

It would have been good to have the instructions mention the need for two helpers at this point (not just the generic comment that assembly requires three people for the entire shed) and to suggest how to hold them in place while the pins are pushed, the gable is fitted and then the screws are put in to secure the gable to the front walls.
Rear tile separated as I had to shift the shed during wall installation - will have to fix later
With the gable fastened down, I moved to roof installation. A truss is placed onto the walls, then the roof panels are placed and screwed down one by one. Unfortunately, all the roof panels are warped, most are not too bad so I started with those. A bit of wrestling is needed to get the screws in each portion to pull out the warp and cinch down the roof section.
Shed with doors and gables installed, beginning roof panels

First roof panel in place (notice how tight it fits to the available space
Daylight ran out by this point so it was time to call it a day. Tomorrow I finish the roof panels, after which some roof caps get screwed down, skylights installed into those, windows installed and finally the shed can be anchored to the platform as a completed project. 

Wednesday, January 7, 2015

Shed work, keypunch interface coding and 1401 restoration work

NEW KEYPUNCH INTERFACE DEVELOPMENT

I worked on the program to drive the keypunch interface - it is written in Python (because I like the language) and will serve as a reference for using the interface if other users want to write their own code to accomplish specific tasks with a keypunch.

This program will open text files on the PC and punch their contents using the keypunch. It offers some rudimentary error checking of the files and the ability to restart from a specific card image after jams or other problems arise. In addition, the program will read cards from the keypunch into a text file until the user tells the program that the last card has been read.

I am documenting it sufficiently that someone who doesn't know Python can still understand the flow and how you would use the keypunch interface box, although they would then have to code it up in their choice of language without a template like mine to copy.

I built the overall program structure, but not the file read/write functions or the protocol with the interface box. It was time to finish for the evening so I put it aside for another day. The code is in Python, using pySerial to control the serial stream and likely will make use of wxPython to give it a modern GUI.

DATACENTER SHED CONSTRUCTION

The seller of my shed is redeemed, now that I have figured out the touch and snapped in 40% of the walls in just a few minutes. The final floor tile piece is still too stubborn to interlock, but I will have some help tomorrow and get it sorted out. I had to stop with the walls when I reached the missing floor tile, otherwise I would have had all the walls installed in short order.

CHM 1401 RESTORATION WORK

I went to the Computer History Museum in the late morning to help out with some of the recalcitrant machinery. We were working on a pesky problem where the 1402 Card Reader/Punch would sporadically signal read checks on column 49, although the data entered into memory and the card itself were fine. Further, the brushes and everything else we could find seemed to be working properly.

A few of the team members hooked in a temporary fixture to the 1401 which would reverse the read and check brush inputs. The reader has two sets of brushes, each of which sends it character to the reserved memory location (the reader uses locations 1 to 80 in core, specifically location 49 for the failing column). If the two don't compare equal, a reader check is raised. The error could be on either set of brushes, the check is just to ensure they match.

However, the machine didn't work when they powered it up. It was displaying storage errors even through we saw valid data coming out of memory. We began working through the logic diagrams and putting various signals on the oscilloscope to determine where the problem was originating.

At some point as we opened logic gates, inserted probes and checked signals, we opened a logic gate and as one of the members was pushing on the probe, we spotted that a number of the backplane pins, where the wirewrap connections are made, were bent over with a couple shorting to each other.

After powering down and straightening out the pins, we brought the machine up to find our storage problem gone. A power cable for a cooling fan was curving into the space where our logic gate fits when closed and the cable was what snagged and bent all the pins in an arc at the corner which struck the cable. The cable was moved out of the way and secured with a cable tie, to ensure this didn't happen again.

We ran some code and tests successfully , then shut it down in order to go up to a conference room for the group lunch. After a quick meal and some conversation, we went down to the machine. The jumper fixture to reverse the check and read brushes was reinstalled by another member and when we powered back up, we had a new storage problem. Nothing was going into or out of the first 4K characters of memory. A quick look reassured us that the pins were okay.

We began tracing logic and checking signals for this new storage issue, which after an exhaustive verification showed us that the control, data and timing signals were operating correctly. To test further, we had to verify that the cores were actually being driven to flip state, the central process behind core memory. However, these lines were current driven, thus no voltage swing was there to monitor with the scope. We would need to begin sensing with a current probe.

Not having one handy, we began to clean up and leave the machine for the next day when team members would be in to service it. The special fixture was removed that swapped read and check brushes, when someone decided to power it up one last time. It worked again! We have a definite problem in the fixture, which is an approved service tool that has been used by IBM engineers for decades to debug 1401 systems.

Something is definitely wrong with the fixture - we will sort that out next time, when we also try to dig into the read checks on column 49. I will be away on a trip next week but there are quite a few other team members who will be in and working on this. Sometimes the problem is not the machine, it is the tool! Good to remember.

Meanwhile, the card punch on the other 1401 system had been getting punch checks due to skewed cards entering the machinery, but someone spotted a missing screw on the throat bracket that allows just one card to enter per cycle. Replacing that resolved our checks, giving us a 1402 that read and punched just fine. 

Tuesday, January 6, 2015

keypunch repair completed, shed construction continues as the base and flooring are installed


NEW KEYPUNCH INTERFACE DEVELOPMENT

The new feed wheel is noticeably larger in diameter than the worn item it is replacing - this would definitely have caused the symptoms I experienced. I installed the wheel in the keypunch and it now operates exactly as it should - cleanly registering cards to the read station, cleanly ejecting and clearing cards up to the stacker.

Here is a very short video of the cards registering and then releasing properly. Video of correct registration and release

I hooked up a terminal and repeated a few tests now that I can check for some more automatic behavior that depended on autofeed, proper registration and release of cards. Card reading was flawless, as was punching. The one function that isn't working reliably is verification mode, where the interface reads the card it previously punched while it is punching the next card, comparing what it had punched into the card to what is sensed at the read station.

I will do some more testing later this week and see if I can tighten up the operation of verification mode. I have moved on to finishing documentation and providing sample programs to exploit the interface box.

DATACENTER SHED CONSTRUCTION

I was down to only two pilings that had to have their height adjusted, with the framework sitting flat and level. After tweaking the pilings, it was time to haul the plywood sheets around and screw them down onto the framework. By mid afternoon I had the sheets in place and was finishing up screws to hold them down to the frame. With more than 100 screws to ensure it was tightly together, it did take some time to complete.

Starting to install plywood sheets atop the framework
I prepared the key parts to assemble the plastic floorboards that sit atop the platform I just built. By the early evening I was assembling the floor panels on the base. That was when I discovered that these plastic parts didn't just pop together like the instructions promised. The floor plates were bent a bit and that made it very hard to engage all the tabs necessary to link the floor plates together.

I managed to wrestle four of the five plates together, with the help of my son-in-law, but the final plate just wouldn't fit into place. I finally had to walk away, returning to this tomorrow to try to finish the flooring and begin erecting walls. The walls have tabs on the bottom which are supposed to just snap into slots in the perimeter of the floor plates. I attempted to put up the first corner section but was unable to get any of the tabs to engage.

Monday, January 5, 2015

Data Center Shed construction day 3 plus some other work

I went into the Computer History Museum today to work with a few of the team members trying to restore both of the 1401 systems' card reader/punches to full operation. We have broken parts, maladjusted machinery and oxidized connectors which had to be faced. A great deal of progress was made but we still have erratic read checks on one machine and punch checks due to skewing of incoming cards on the other machine. At least all the other problems appear fixed.

DATACENTER SHED CONSTRUCTION

This morning I installed the three cross beams on the platform base that will have limited accessibility when the framework is put in place on the pilings. It is now ready to be moved onto the pilings once I get them suitably level and properly situated.

Placing and leveling pilings
The pilings were tweaked and leveled, then the framework put in place. A few of the pilings still need some adjusting, but with just a bit of work tomorrow the framework should be level and ready for the plywood sheathing to be screwed atop it.

Framework ready to move onto the pilings
I cut the three major sheets to size today and have them ready to move into position. One of the remaining cross beams was nailed into place, the other two are ready to nail down tomorrow. There is one 4" by 93 1/2" strip of sheathing to cut, which will fill in the extreme rear of the platform after the three main sheets cover 144" of the 148" total depth.

Tonight I unpacked and organized the parts bags for the coming construction steps and located the first large plastic parts (floor boards) I will need. Since I feel optimistic that I can wrap up the construction of the base tomorrow, I will be assembling the rest of the shed beginning immediately afterwards.

Time to start planning for tasks in and around the shed

  • internal lighting (probably overhead fluorescent fixtures)
  • the power feed cord that will be connected to the outdoor fixture on the house
  • fan with thermostat and battery to keep temperatures reasonable on hot days
  • plan for outdoor fixture to feed 220V to the shed
  • temporary ramp to get the 1130 system up into the shed

NEW KEYPUNCH INTERFACE

I updated the documentation on GIThub for the keypunch interface, including pages from the 029 wiring diagrams with indications of where each wire should be attached for the cables going to the interface box. The project is public, named KPgolem, and has all the Arduino code and the construction manual uploaded.

I am working on a detailed wiring diagram for the interface box and details on the voltage regulator board I built for the unit. I also listed the specifications of the RS232 and relay boards I used for the reference implementation.

Over the next few days I will complete the other parts of the project documentation including a sample program to use the interface.

While at the CHM today, I picked up a replacement feed wheel for the keypunch, which hopefully will restore its ability to properly register cards at the read station. I will install the new wheel in the next couple of days and get the keypunch working well.

Replacement feed wheel for my 029 keypunch

Sunday, January 4, 2015

Shed construction day two

DATACENTER SHED CONSTRUCTION

Today was dedicated to work on the shed, leaving no time for work on the 1130 system.

I finalized the positioning of the 12 concrete pilings upon which the base of the shed will sit. Since the shed just fits into the space on the side yard, between the wooden fence at the property line and the living room fireplace chimney, the pilings have to fit against the fence. Each upright on the fence is set into cement in the ground, thus the piling can't be sunk into the ground at those spots. I worked out a siting and spacing that clears the sections of in-dirt cement and fits along the chimney brickwork.

The pilings have to be flat and in line, so that the wood framework will sit in the notches of the pilings and be level in all directions. The terrain was not flat, requiring some excavation under each piling. The pilings are roughly at the same height, based on using a large beam and bubble level, but some fine tuning is still needed.

I also cut all the wood for the framework to size, then began nailing in the cross pieces. I have all the cross pieces completed for the side that will fit against the fence, since there will be no space to swing a hammer once the framework is in place. Three crosspieces on the other side must be put in before the framework can be placed on the pilings, since these holes are partially or fully blocked by the chimney brickwork. The remaining cross pieces can be installed while the frame is in place.

Tomorrow I have to finish the leveling of the pilings, install three cross pieces, then haul the heavy framework over to its final site and place it onto the pilings. It shouldn't be too long from that point until the flooring is in place and I can start erecting walls.

I completed the right door assembly as well, so that all the sub-assemblies are complete and ready to put into place. Another task I did in between carpentry and digging was to plan out the placement of the 1130, its peripherals, the keypunch and storage for cards and disks. Since the inside space will be approximately 89" by 146", it will be tight inside. I have a workable layout. 

Saturday, January 3, 2015

Keypunch rehabilitation work and start of construction of the 'data center' shed

I skipped a day with the diary, including work from both Friday and Saturday in this posting. We are having a cold wave in California and it is hard to do much work when the work area is 42 degrees F inside. I lose part of the day waiting for it to warm up.

1053 CONSOLE PRINTER RESTORATION

I polled some typewriter enthusiasts to see if anyone had a spare motor pulley to replace the part that was corroded on my I/O Selectric mechanism. So far, no luck. I will check with Grainger and other suppliers to see if I can find a suitable replacement to fit a 5/16" motor shaft.


1131 DISK DRIVE RESTORATION

xxx


1132 PRINTER RESTORATION

xxx


CHI INTERFACE AND DISK DRIVE

xxx


1442 CARD READER/PUNCH RESTORATION

xx


NEW KEYPUNCH INTERFACE DEVELOPMENT

I set up a repository for this interface on Github as KPgolem, public as of yesterday (Jan 2). Initially I will upload the Arduino source code, following it later with all the details of keypunch modification, cabling, and hardware construction advice for the interface box.

I worked on the keypunch all day trying to get the adjustment right to allow the card to register in the read station but be able to move through when released. I could get one or the other but not both. I need to disassemble more of the keypunch to see what I might be able to do as a fix.

The eject and read head, the part with the two roller arms that sits over the read station, determines the relative timing of dropping the gate that blocks card movement to the movement of the two roller arms. The arm that registers the card does not move down far enough, although it may partly be a problem with how much the running feed wheel sticks up through the card bed from inside the keypunch.

I will take the card bed off and look more closely at the feed wheel and any shims for card bed height. If I can drop the bed or move the feed wheel a bit more forward, that could solve the problem. If not, I might need a bigger diameter wheel, as wear and age may have dropped the diameter below its effective range.

Keypunch after removal of card bed and other parts, then removal of feed wheel

Alternatively, I have possible modifications to the roller arm, either increasing the effective diameter of the metal roller or changing the rotary position of the arm when engaged to push it closer to the feed wheel, while the gate the blocks card movement is not yet dropped into the card path.

I removed the feed wheel and measured it - exactly 1 3/16" diameter at the rubber rim - although I have no spec to compare this to. The shaft on which it is rotated can't be moved forward, nor can the card bed be moved deeper. The only adjustable items are the feed wheel diameter and the positioning of the metal roller.

Feed wheel for read station registration, after removal

Eject unit that pinches cards onto the read registration (and stacker eject) rollers
I will check the size of the spare wheels at CHM to see if it makes any sense to replace the drive wheel. This will take a few days of investigation and work before I can get the keypunch working as it should.

DATACENTER BUILDING (SHED) CONSTRUCTION

I spent much of today working on the 8 foot by 12.5 foot shed that will house the working system in the side yard of my home. I built part of the wood platform upon which it will sit. The platform itself sits on 12 concrete pilings, even though it is pressure treated wood that could have been put directly down.
Building the framing of the platform for the shed
The reason is the uneven area, 100 square feet of it, that I would have had to level if I wanted the shed to sit directly on the ground. This way I only have to dig and adjust the height of 12 pilings, about 11 square feet worth of digging would be involved.

I have more work to do on the platform, including cutting and screwing down the 3/4" plywood sheathing that completes the substrate, in addition to the digging and setting of the pilings. However, it is less than a day's additional work to get the platform itself complete and ready for installation on the pilings.

The plywood sheathing won't be installed until the framing is on the pilings, allowing me to pick up and move the framing onto the pilings. The total weight would be too much if it was completely screwed together first.

I began construction of the shed itself, those parts that don't require the platform to be ready, such as trusses, gables and doors. I have only one of the doors left to prepare, after which I will have to wait. The following step is to lay down the plastic floor of the shed atop the installed platform, then erect the walls.

Trusses and gables built and ready to install
Left door built and ready to install