Monday, May 30, 2022

Done with all but 1132, 1442 and 2501 device controllers

DEEMED 2501 ALD IMAGES CLEAR ENOUGH TO WORK OUT, WILL ENTER THEM

This adds an additional 24 pages to the original 226, bringing the entered ALD page count to 250 but I believe the extra work is worthwhile. This reader is not configured on either my system or the unit I am restoring for the Maryland museum, but it increases the generality and utility of this database for dealing with other IBM 1130s I may encounter. 

FINISHED OFF ORIGINAL ALD PAGES OTHER THAN 1132 AND 1442 CONTROLLER LOGIC

The line printer and card reader/punch pages will wrap up all of the original pages I intended to enter, thus that would be 15% remaining. The addition of the 2501 logic pages will stretch out the completion of phase 1 a bit.  

Sunday, May 29, 2022

Finished with volume 3 of 4 ALDs, entering remaining device controller signals

176 OF 226 PAGES ENTERED THROUGH END OF VOLUME 3

At this point I have recorded 3,137 signal pins that are outputs or run over backplane to backplane cables. This is 78% of the way through the ALD pages, although I may have enough to enter the 2501 device controller pages which are an additional 24 pages. They are a bit blurry and may have details chopped off, rendering them unsuitable for entry to the database.

PAGES THAT REMAIN ARE CERTAIN DEVICE CONTROLLERS

The coming pages are sections that begin with XP, XR, XT and XW. If the 2501 controller pages are good enough, those begin with FR. 

XP pages are for the 1132 Line Printer, consisting of 13 pages of logic.

XR pages support the 1442 Card Reader/Punch, consisting of 21 pages of logic.

XT pages support the 1134 and 1055 Paper Tape Reader and Punch respectively, consisting of 11 pages of logic.

XW pages support the 1053 Console Printer, an Input-Output Selectric that is print only. This consists of 5 pages of logic.

EXAMPLE OF AN ALD PAGE FOR A DEVICE CONTROLLER


This page produces 13 output signal pins and 1 connector cable pin into the database. There are ten named output signals but some are connected to more than one card pin, e.g. +Pwr Reset or NPRO which connects to both A-B1-J3-D10 and A-B1-B3-J04 pins. 

Friday, May 27, 2022

Completed all of central processing unit, now entering device controller ALD pages

 ONLY DEVICE CONTROLLER LOGIC REMAINS TO ENTER

The ALD pages at the end of volume 3 and the remainder of volume 4 cover the device controller logic that resides inside the 1130 system. Each device, if configured into the system, has controller logic to react to XIO instructions, deal with interrupts, status words and handle the mechanics of input-output for the device. If a device is not part of the system, its logic is not installed. 

Even though keyboard, console entry switches and console printer are included on every system, they are treated like the other peripheral devices. I have completed everything else in the system and will now only be entering the controller logic for the devices for which I have ALD pages. These are:

  • Keyboard
  • Console Entry Switches
  • Console Printer (1053)
  • Internal disk drive
  • 1134 paper tape reader
  • 1055 paper tape punch
  • 1627 plotter
  • 1132 line printer
  • 1442 card reader/punch
  • 2501 card reader
Other devices that can attach to the 1130 system with controller logic inside are the 1231 Optical Mark Sense Reader and the Synchronous Communications Adapter. The 1130 I am restoring for the museum in Maryland has the SCA configured but I lack the logic pages. I may have pages for the SCA from another 1130 system, in which case I will enter them in the database.

Some devices that could be attached to an IBM 1130 system were only supported by attachment to the 1133 Multiplexor box. This contained the controller logic for those devices, and in turn it attached to the 1130 system through the Storage Access Channel (SAC) feature which is documented as part of the processor. I have never come across ALDs for the 1133 or the controller logic contained inside. Devices that attach through the 1133 or the SAC include:
  • 1403 line printer
  • 2310 additional disk drives
  • 2420 tape drives
  • 2250 graphics terminal
  • 2311 disk drives
The processor itself, before I began entering the device controller signals, had 2,799 signal pins listed in the database. As previously stated, these are output signals that flow to other ALD pages as well as signals that flow between compartments (backplanes). It does not include signals that flow on a backplane purely within an ALD page. 

Thursday, May 26, 2022

Halfway through entering signals into IBM 1130 database

REACHED HALFWAY POINT, 113 ALD PAGES ENTERED

I am partway into volume 3 of 4 of the Automated Logic Diagrams, having reached page 18 of this volume which is the 113th page I have entered into the database. For each I entered the gate, compartment, card slot and pin number along with the ALD page/gate and signal name. 

The memory control pages were particularly slow and cumbersome to enter, because I had to deal with the challenges of three different memory configurations. These were handled by notes on the pages about jumpers to place in various situations. I had to convert these to a form of signal name and record the pin locations.

The basic memory building block is an 8K core stack that fits on a backplane with surrounding SLT cards as drivers and other control logic. The smallest machine model is 4K which is a cut down version of the 8K stack. The stack logically consists of 18 planes, storing a 16 bit word and two parity bits. There are 8192 locations that can be addressed by unique X and Y values that define a point on the plane where one core sits. 

Larger machines than 8K can't fit in the standard part of the frame and instead require an additional cabinet extension, called the blister, which fits on the left side of the machine. This has one or two additional gates so that it can hold up to 32K of core. IBM calls machines with the blister Expanded Storage models. 

Because the signal distances are longer, it required line drivers and terminators, adding some gates and circuitry. Thus, there are jumpers shown on the ALDs to route signals to or around those driver gates (whose cards would not be populated on a non-ES machine). 

In addition to the ES configuration, later models of the 1130 were enhanced with higher performance. This was accomplished in part by fitting a different core storage module that was faster. The original models have a 3.6 microsecond memory cycle time, using the 'SJ-4' core storage modules. The faster models operate with a 2.2 microsecond memory cycle time using the 'SJ-2' core modules. 

There are additional gates for signals to 'look ahead' to provide conditions early enough to fit the tighter timing in a faster machine. A particular chain of logic gates might work just fine with the 450 nanosecond cycle time but it has enough serial gate delays in the chain that the 275 nanosecond cycle time is not long enough. 

Providing an early signal reduces delays in the chain and ensures reliable operation for the faster models. There are notes in ALD pages and jumpers that reflect where the design would differ between the two machine speeds. 

I was able to record the data so that I can debug machines like my own that are expanded storage models, as well as smaller machines such as the one I am currently restoring. I will be able to debug the 2.2 microsecond models if I were to work on one as well as the 3.6 us models I have worked with. 

All these variants and jumpers made the database entry particularly slow for the memory pages. Fortunately it was compensated for by the major register pages. These are replicated circuits - one SLT card provides the circuits for 2 bits of a word, thus eight of them are needed to produce a full 16 bit word register. 

In fact, these cards usually implement more than one register at a time, so that the RAxxx pages implement two bits of both the A and the U registers in one card. The RBxxx pages implement three registers, two bits at a time for each on one card. In a bit of inside humor, these registers are the I, B and M registers and the pages are labeled in that order to spell out IBM. 

Because of the high degree of regularity, I could copy and paste, change labels, change the particular card slot number and then handle the small variations that come from the routing over cables between backplanes. This sped up the entry of these pages quite a bit. 


Monday, May 23, 2022

Reached 1/3 point entering all IBM 1130 output signals and cable connections into database

COMPLETED 75 PAGES OUT OF 226 IN MY ALD SET

At this point I have recorded 1,650 output and cross backplane cable pins. This is the 1/3 point measured in pages of ALD entered. 

I expect to have a bit more productivity when handling the pages for the major registers as we are looking at 16 copies of essentially the same circuitry, simply changing the signal names for the output but using the same card types and pins each time just in different slots of the backplane.

On the other hand, the I/O device controllers will be slower paced - fortunately they are in the final 1/3 and the finish line will be in sight. 

Saturday, May 21, 2022

Completed wire wrap fixes to replace temporary jumpers,

 WIRE WRAP TO REPLACE TEMPORARY JUMPERS IN 1130

I removed the two temporary jumpers and replaced them each with a permanent wire using wire-wrap onto the backplane pins. This is more reliable and isn't as easy to snag and pull off as the hanging jumpers. If I discover any further issues with failed traces I will apply additional wire connections. 

The backplanes have long square pins sticking out on the backside. Traces on the backplane make connections between some of the pins, but the remainder of the connections are made with wire-wrap in an automated machine. Later in the field, additional connections can be made by the local engineer using wire wrap tools.

The pins have a square cross section. Thin wire (30 gauge) is wound around the pin which creates tight gas-proof connections at each of the 'corners' as the wire bends around. These stay very tight and reliable with no oxidation of the contact area. 

Wire wrap tool and wire

In my experience working with machines from fifty or sixty years ago, wire-wrap links effectively never fail; the rare cases involved wires being snagged and severely pulled. In contract, the printed circuit traces on PCBs and backplanes do fail at a non-zero rate, generally a result of flexing of the board over time. 

My wire-wrapped connection in light blue

Another wire wrapped connection in light blue

COMPLETING CONNECTION OF WIRE LOOMS TO ARDUINO SHIELD, DEBUGGING

I finished wiring up the looms to the Arduino shield, verified the lack of shorts between adjacent solder connections and began testing. I had some problem with the power method I used for the Arduino and need to rethink this a bit. 

Completed attachment of looms to Arduino and shield

I had taken the +12V from the IBM 1130 as an input to a LM7805 regulator to provide +5V for the three relay boards as well as the Arduino, feeding the +5 to the pin marked +5 on the Arduino board. It appears that instead I should feed the +12 to the Vin pin and let the Arduino do its own regulation to +5V. My LM7805 can still power the relay boards. 

Friday, May 20, 2022

Building looms and connectors for Memory Load tool, continuing to build database of 1130 signals

WORKED ON THE MEMORY LOAD TOOL

I want good solid, reliable connectors onto the relay boards for the connections back to the Arduino. The relay board has a header strip, standard .1" pitch, with the eight relay control inputs, VCC and ground pins. I chose stranded wire as it is less likely to snap under repeated bending or movement, crimped into terminal that are pressed into the housings to create the connector.

The three wire looms are completed and laced up, with the connector attached to one end. I verified proper operation of the relay boards through the loom. Next up is hooking all 19 signals and multiple power lines from the loom to the Arduino shield. I began the task but it will take some time to be sure that this is done correctly.

Two of the three wire looms for Memory Load tool

Beginning connections to the Arduino shield

PROGRESS ON OFF BACKPLANE SIGNAL DATABASE

By this point I have completed 1/5th of the ALD pages, moving along at about the pace I expected when I began the project. I spend about four hours a day doing this work, the rest is spent in the shop on other activities. 


Thursday, May 19, 2022

Continued build of Memory Load tool, continued entry into database of signals on backplanes

CONTINUED BUILD OF THE MEMORY LOAD TOOL

On the Arduino shield there is a 7805 regulator chip with heatsink to  generate the +5V needed for the Arduino and relay boards from the +12V sourced by the IBM 1130. I built this and tested its operation. 

I began creating connectors to hook the relay boards to the Arduino in its project box,  where I solder the other ends of those wires to a shield for a more reliable connection to the Arduino. I began lacing the wires together to form a proper wire loom on the connector for Console Entry Switches 8 to 15 which are controlled by the leftmost of the relay boards. 

I did some testing of the wire loom and relay board, but did not complete the lacing nor start the soldering to the shield. Next visit to the workshop will have me finish this connector and move on to the next two relay board connectors. 

CONTINUING TO ENTER SIGNALS FROM THE ALD TO THE DATABASE

I go to 13% completion on the data entry pass 1. This is where I record all the output signals (right hand side of each ALD page) and all the off-backplane signals running over the cables between compartments. The next pass is where I record where each of the signals, when they are inputs on the left side of the ALD page, are routed to card pins. 

Progress report on signal mapping project

COMPLETED 9% OF THE ALD PAGES, SOME STATISTICS

Reaching the end of my ALD Volume 1 with 21 pages captured, I have 611 signal locations recorded. This is strictly the outputs and off compartment connections from those pages. 

I will continue on with the project since continuity testing this number of locations is going to take less than one hour, not counting rest and sanity breaks. I projected this with a beep rate of a bit under 5 per minute on average. 

I have been adding in signals and pages I captured from various sources for features that are not on this system and some that are not installed on my 1130 either. This maximizes the utility of this database for any future IBM 1130 restoration or study. 

Features included this way are the plotter, 1442 card reader, 1132 line printer, synchronous communications adapter (SCA), paper tape reader, paper tape punch, 2501 card reader, and Storage Access Channel (SAC). The only feature that is missing entirely is the 1231 Optical Mark Reader as I have not encountered any ALDs with that feature configured.

READY TO WIRE WRAP TO REPLACE THE TWO TEMPORARY JUMPERS

I will apply some wire-wrap connections to replace the temporary jumpers that I added in two locations to compensate for broken/open traces on backplanes. Any additional missing traces will be repaired similarly, once I verify that a jumper resolves whatever problem that lead me to the failed trace.  

Tuesday, May 17, 2022

Beginning project that is possibly too large to be feasible - full netlist and locations of the IBM 1130

CONSIDERING THE NETLIST AND CONNECTIONS TO DEAL WITH BROKEN TRACES

Since I already have found two backplane traces that were broken, which are on different backplanes and physical locations, the odds are high that other such failures exist. Correcting them is a simple matter of adding some wire wrap connections. 

The challenge is in finding them. A signal may only occur in special cases, for example a multiply where an overflow occurs or some special combination of timings. I am unlikely to be able to run a sufficiently comprehensive set of tests to find every one of them; some may produce subtle malfunctions that are hard to spot. 

A method guaranteed to succeed is continuity testing each connection. If I take the simplifying assumption that these failures are all from edge connectors inward, rather than potential failed traces within a backplane from card slot to card slot, then this list would give me the information I would need to beep out each netlist signal. 

The time to execute the continuity test is pretty substantial. There could be a max of 20 edge connectors on a board but 12 is a more reasonable average. A connector has 24 pins; we will assume a usage of 20 per connector. This means that each compartment has 240 pins whose destinations need to be beeped. 

If I complete the beeping and verification of a pin in 30 seconds, it will take 120 minutes per compartment. Six exist on this machine so 12 hours of beeping once I have the netlist. 

COLLECTING IMPORTANT INFORMATION

This will involve two passes through all 226 pages of ALD. The first will generate all the outputs (right side of the page) plus the off compartment connections and the pins of cards within the page connected to that output signal. The second will record where each input signal runs to pins on the page, where an input was an output previously recorded from some other page. 

I chose to collect the following information as fields so that I can sort this different ways to get full use out of it:

  • Gate - A, B, C, D or E
  • Compartment - A1, B1 or C1
  • Slot - A1 to N8
  • Pin - B02-B13, D02-B13, G02-G13, J02-J13, plus bottom/top pins
  • Netlist name - ALD page name plus signal location, e.g. BB101AA4
  • Signal name - logical signal name, e.g. -IO Bit 3
POSSIBLY TOO BIG AN EFFORT TO FINISH

With 226 pages producing perhaps 20 output locations per page, we are looking at over 5,000 line entries in the spreadsheet. This will take quite a bit of time to collect and will be tedious work. A rough guess is four pages per hour, four hours per day max time I can put onto this, thus two weeks to complete. 

I may discover that some internal traces are broken, while debugging various issues on the machine. If so, there are a huge number of possible connections to test, with up to 20 signals per SLT slot and up to 66 card slots in a compartment (backplane). Not every slot is populated and not every pin is assigned. 

As an estimate, if we assume 40 cards per compartment and 16 signals per card, we have to beep connections between 640 pins. I won't need to do any exhaustive search of all combinations of the 1320 total pins, since my project could, in a third pass, produce just the pin to pin connections I need to test. 

Monday, May 16, 2022

More work building the memory loading tool,

 REWIRED PROG START AND LOAD IAR BUTTONS TO RELAY BOARD

The Prog Start (Program Start) is the button that triggers a step or begins running a program. It also triggers a memory load or display when the rotary mode switch is in the Load or Display positions. This button switches +12V between two logic signals.  A pair of relays on the eight relay board will disrupt the usual connections and cause the switch to appear pressed when active regardless of the state of the button. When not activated the relays leave the button free to operate normally.

The Load IAR button has one set of contacts feeding a single signal output, thus it requires only one of the remaining relays on the relay board. Rather than switching +12V, this is connected to part of the rotary mode switch so that it gets 12V only when the machine is in the Display or Load modes. 

Back of Prog Start and Load IAR button switches

This does leave five relay positions open for future expansion. I have no immediate plans for any other button control by the Arduino. I removed the signal wires from the two switches, extended the leads and connected them to the relay board. 

CONSTRUCTING MORE OF THE MEMORY LOAD TOOL

Near the two relay boards controlled the CES, I mounted the small PCB with the 470 ohm resistors. This provides +12V through the relay when it is activated. Small runs of wire stretch between the relay boards and the resistor board, plus one larger wire is connected to the +12V source nearby. 

Resistor board wired up, laced and installed on 1130

Routing the wires, dressing them and lacing it to make things neat takes time but produces a nicer and more reliable result. I spent hours completing all of this, leaving only the project box side and the signal cables from Arduino to relay boards. I expect to receive the 7805 voltage regulator soon and can complete the shield that fits to the Arduino Mega

All wiring to the 1130 is complete

The cabling between Arduino shield and relay boards needs to be carefully built and neatly laced, started with a solder joint at the shield and ending in a 10 position connector for each relay board. I will be away for a couple of days, then get back to the slow work finishing off this tool and putting it to use.

Plastic guard in place around CES wires

Sunday, May 15, 2022

More restoration of keyboard, building and installing the tool to load memory

TESTED ALL CONTACTS ON KEYBOARD

I hooked up the ohmmeter to all the contacts of the keyboard and sequentially checked the resistance of each set of points when they were closed. Any that weren't low enough were cleaned again. The goal of this work is to ensure that they keyboard properly encodes any keypress to the correct word data - Hollerith in the left most 12 bits. 

Bits 12, 13 and 14 are used to encode three control characters that don't have Hollerith codings - End of Field, Backspace, and Erase Field. Traditionally the 'device driver' software that controls reading data from the keyboard will use EOF to end the entry and pass the results to the calling program. The other two allow some editing of the entered data before it is presented to the program.

There is a Rest KB button that is a simple switch directly back to the device controller logic. It restores the keyboard, raising any depressed key and resetting any pending interrupt. Another simple switch informs the device controller that any key has been pressed and the permutation unit therefore has encoded the data value. This triggers an interrupt where the 'device driver' software issues a read to pick up that word. 

I use quotes around 'device driver' because the IBM 1130 does not use an operating system. It has a limited function monitor program but often what we think of as a device driver is partly a choice of a subroutine (or user written code) that is part of the user program and handles part or all of the device interaction. 

The monitor is mainly involved in handling the interrupt and transferring control to an interrupt handler for the device responsible for any bits that are 1 in the status word. That small part of the device driver is usually part of the monitor and not linked to the user program.

One of the switches was really stubbornly oxidized. Regular spray deoxidizer and 20 minutes of burnishing didn't drop it much below 1K ohms. Since this provides the +12V through the permutation contacts to produce the data word corresponding to any keystroke, it had to be much, much better than that.

I have some high strength deoxidizer drops that I applied and, finally, in concert with quite a bit more burnishing, I got the contacts to essentially zero ohms when they touched. The keyboard is now electrically ready for use.

Keyboard restored and ready to use

There was one keycap that had broken off - fortunately it was a dead key that doesn't actually produce any codes, but it left an unsightly hole. Fortunately, I have one spare key cap for an 1130. It happens to be the 0 key, not a blank cap, but I installed it since it will look better than the gap. 

WIRED CONSOLE ENTRY SWITCHES TO RELAY BOARDS 2 AND 3

The sixteen toggle switches across the face of the console printer are the Console Entry Switches (CES). These connect the +12V supply through a 470 ohm resistor when the switch is on (up for 1). No connection is made when the switch is in its down (0) position. 

A wire is added to each switch to connect our own +12V to make it a 1. This takes two 8 position relay boards to activate the 16 CES switches. Since the 470 ohm resistor is part of the wiring of the toggle switches, when we want to activate a line we need our own 470 ohm resistor to +12. That is provided on a small board inside the cabinet.

I cut wire segments and carefully laced them up in wire looms before installing. By the end of the day I had them soldered into the console entry switches and the loom routed down under the tabletop to where the relays sit.

Wire loom soldered in place - mine is white, IBM's yellow

I drilled the holes and mounted the three relay boards securely. Next up is the connection of the loom from the CES, connection to the resistor board, and hookup of the resistor board to a source of +12V.

Relays mounted but wires not yet connected

Saturday, May 14, 2022

Diagnosing the keyboard device controller, finding a second backplane trace fault, other work

IBM 1130 PROVIDES SIGNALS FOR DEVICE CONTROLLER CIRCUITS

There is logic in the machine to decode the 'area' in an input-output request. It turns on a signal for each installed device that the designer of that device's controller can test to know when I/O is being directed at the device.

The XIO (Execute I/O) instruction points at a doubleword in memory called an Input-Output Control Command  (IOCC). Among the fields in the IOCC are a five bit area that identifies a particular device and a three bit command type. The keyboard is area 00001 which distinguishes it from other devices such as the 1442 card read (00010) or the internal disk drive (00100). 

There are six possible command types but each device determines which of the six are used with it. The keyboard supports just three commands, B'100 - Control, B'011 Sense Interrupt and B'010 - Read. The Control command causes the keyboard to be selected. A solenoid in the keyboard should unlock it and the Select KB light on the console near the keyboard should illuminate. 

When the operator presses a key on a selected keyboard, it triggers an interrupt on level 4. IBM 1130 interrupts are prioritized, levels 0 to 5 and each device is assigned specific bits in one or more interrupt levels. 

This means that when the interrupt occurs for level 4, the interrupt handler that is executed has to call the device driver code for the keyboard when its sees the bits for that device are set. The interrupt handler issues the XIO command Sense Interrupt to put the bits of the status word in the Accumulator. One of the bits in level 4 tells us that a key was pressed on the keyboard. 

When we know that a key was pressed, the device driver should issue an XIO with the Read command, which picks up the code for that keypress and puts it in the memory location we specify in the IOCC.

The device controller, which is implemented on a number of SLT cards in the machine, will handle a read command and put the value of the keypress on the B register so that the XIO in its storage cycle E3 will store that B register into the memory location. 

The device controller is connected to three signals - XIO Read, XIO Control and Area 1. When it sees its address (Area 1) is active, if XIO Control is active then it triggers the solenoid and turns on the select lamp. If area 1 is active and it sees XIO Read, it puts the keypress data on the B register. There is a bit more to the device driver but it is relatively straightforward.

Selecting the keyboard with a Control command

I watched the Area 1, XIO Read and XIO Control lines to see if they activated as I stepped through an XIO instruction with the appropriate IOCC. If I didn't see these, the problem would lie in the general logic that supports all IO devices. If these did occur, then I would need to move forward in the device controller to see why it is not selecting the keyboard and doing the other actions. 

OBSERVATIONS TESTING THE XIO CONTROL TO THE KEYBOARD

When I observed the first signals I could clearly see Area 1 turn on when an XIO was addressing the keyboard. What I did not see was XIO Control activating. That signal is produced at the correct time during an XIO instruction when the command is a control, in other words when bits 5, 6 and 7 are B'100. There is some simple combinatorial logic to determine this.

Excerpt of logic that generates +XIO Control

Looking at the inputs to the AND gate I found that the signal -U Bit 7 was not high. The other conditions were all true but not this one. It is driven by an inverter gate and I soon found that the input to the inverter was not actively driven high or low. 

This signal comes from B gate over to compartment C1 of A gate where this test is made. The signal enters A-C1 from edge connector N3 on pin D05. The other end of the cable plugs into the bottom of the backplane at B-B1 in slot T5 with the signal emerging on pin C04. I verified that the signal does indeed span from T5 pin C04 all the way to the inverter using the signal in A-C1 compartment.

Source of signal in B gate B1 compartment

What failed was the routing from the SLT card generating the signal down to T5 pin C04. Another bad trace on a backplane from an edge connector to the interior of the backplane. I put in a temporary jumper and now the KB Sel lamp lights when I issue the Control command to the keyboard, just as it should. 

Control command now activates keyboard

Temporary jumper

The prior backplane trace to edge connector was on the backplane A-C1 on the left edge. This trace failure is on backplane B-B1 at the bottom edge. More than one event or failure has occurred here, nothing in common. 

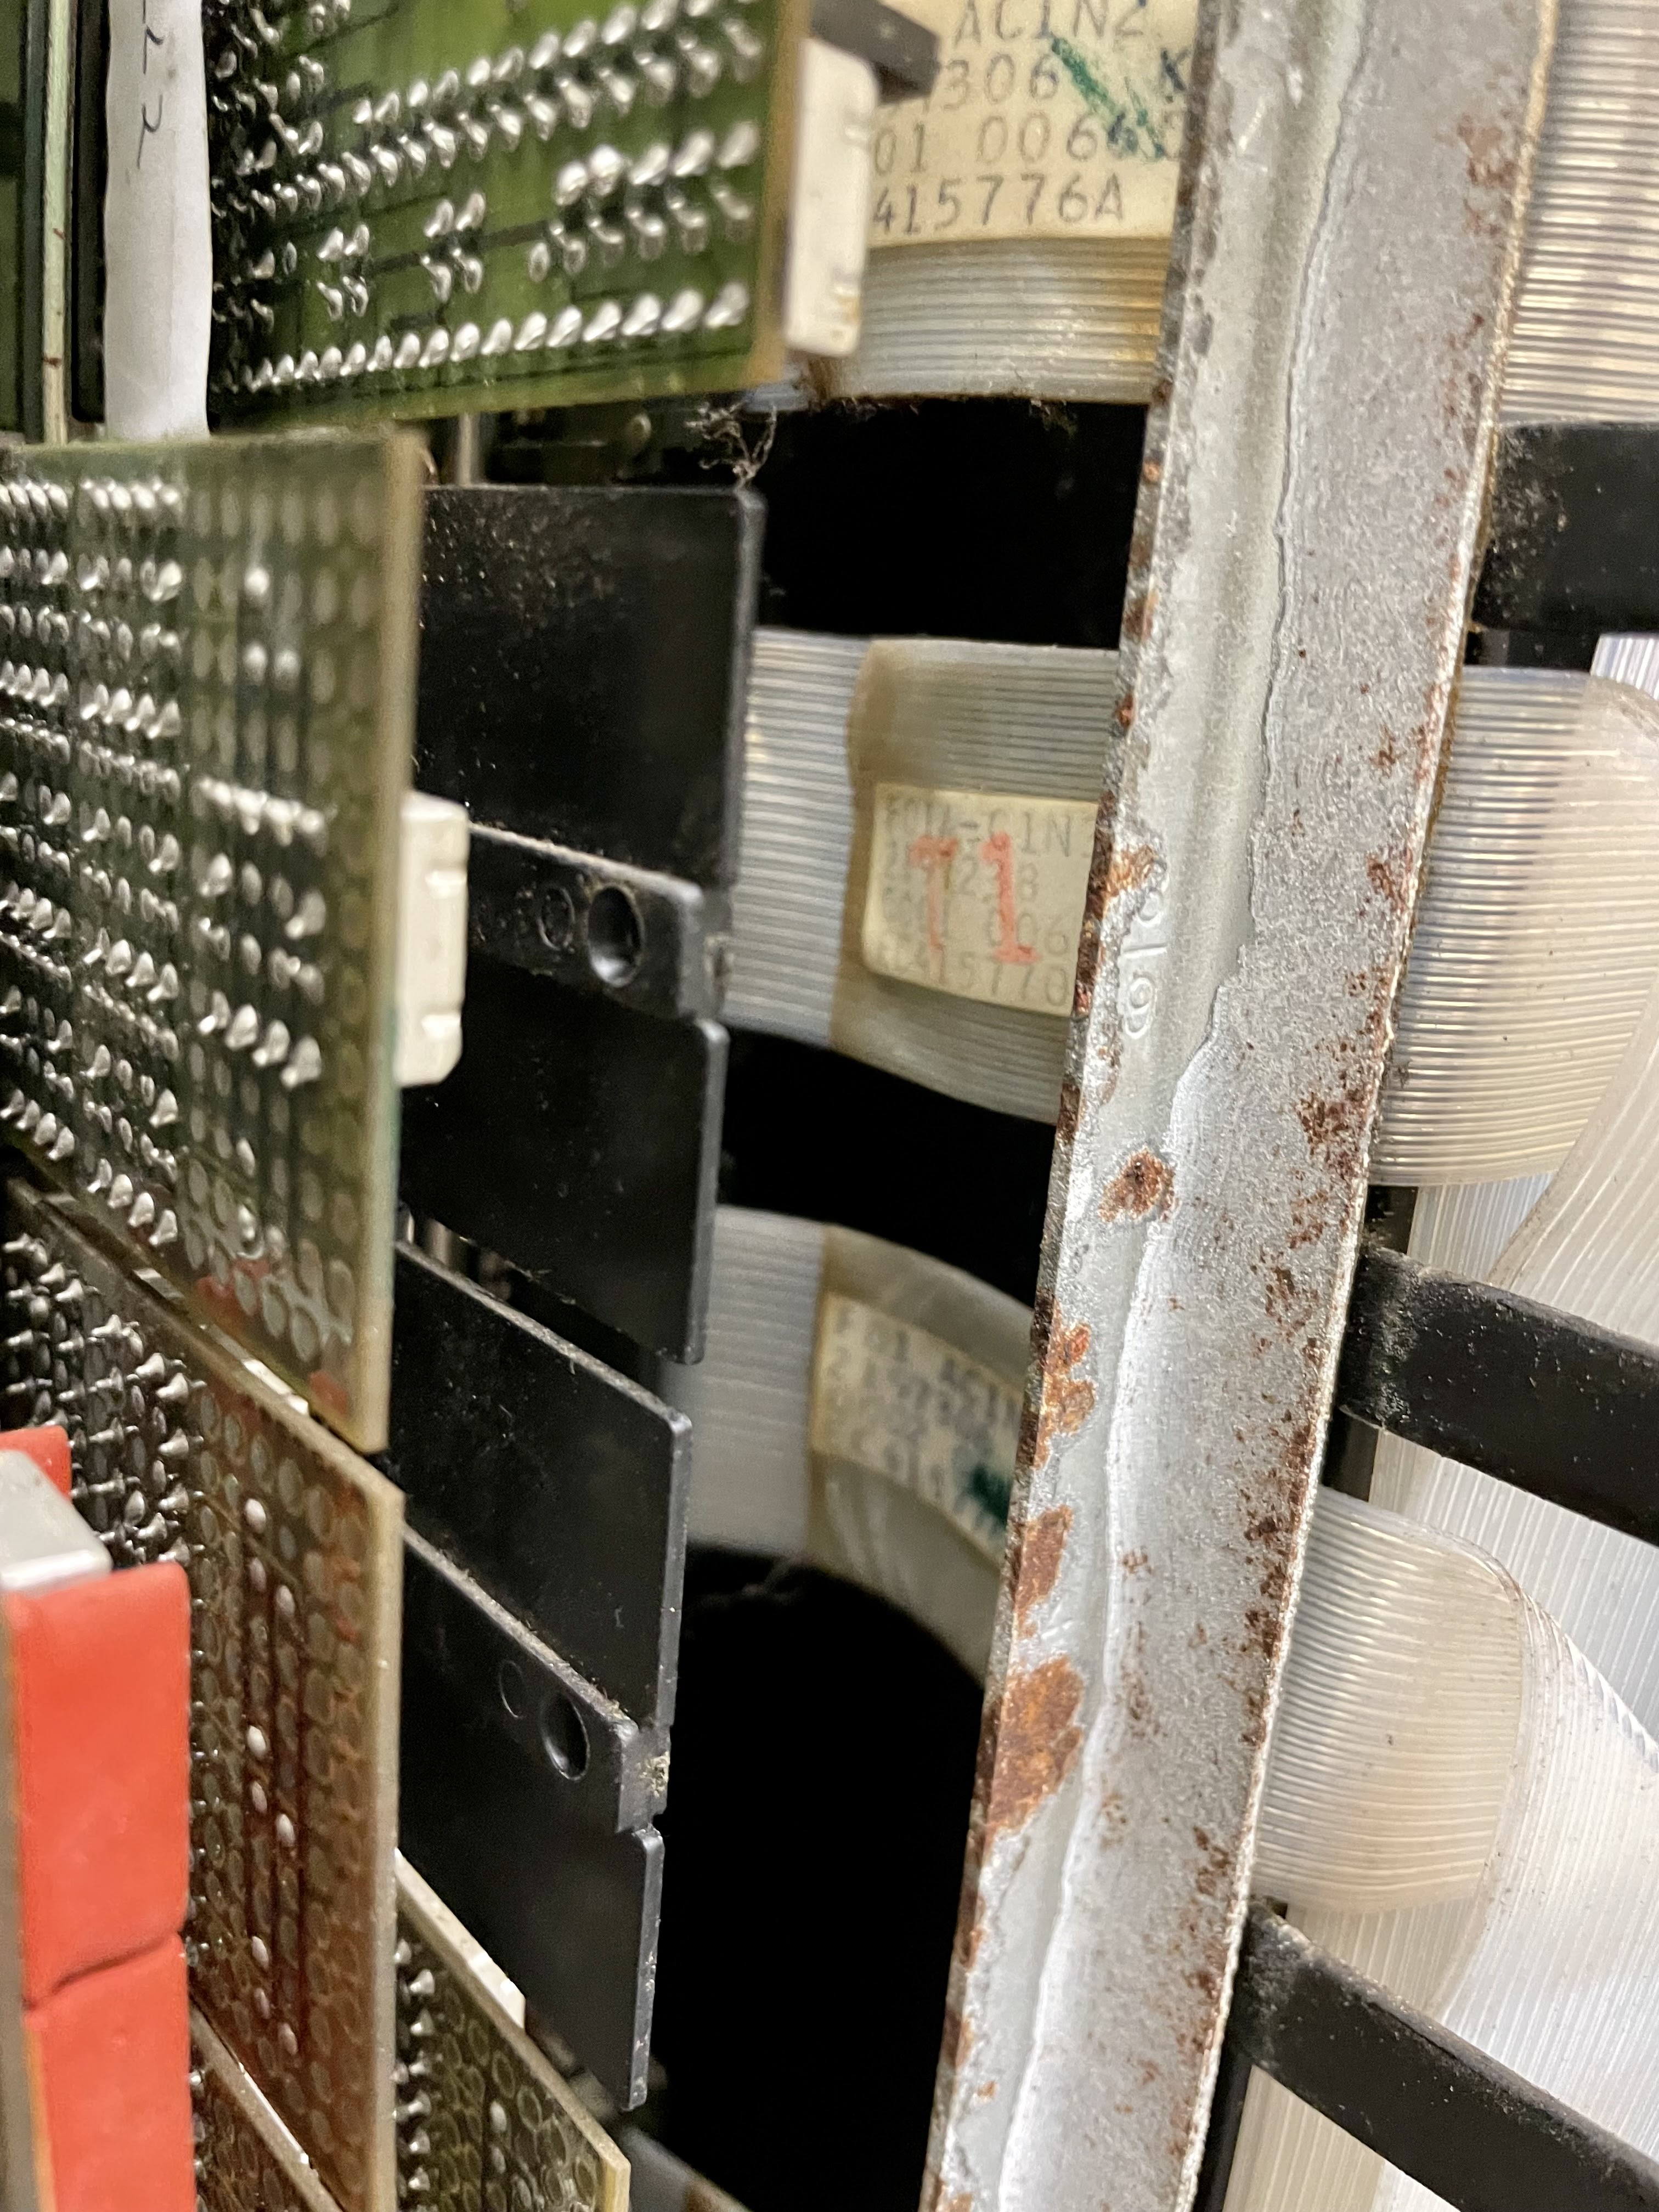
Edge connector cables entering card compartment

I am getting worried about further failures of traces. Two backplanes out of six have at least one trace failure. The only experience I had during the restoration of my own system was with a trace failure that broke the ground rail to part of a core memory backplane. Once I fixed that, I never had another problem on my system. 

Therefore, it is possible that I just happened to find the two problems, if that is all that exist, but I will need to do extensive, exhaustive testing of every function and every permutation and corner case to be sure that key signals aren't missing elsewhere. There are quite a few cables between backplanes.

Map of cables between backplanes and other locations

I will correct these more permanently with wire wrap connections, removing the jumpers.

PARITY ERROR ISSUE IS ALWAYS CAUSED BY BIT 0 FLIPPING FROM 0 TO 1

After some experimenting I realized that when I get a parity error it is always a case where bit 0, the leftmost bit in a word, had been a 0 but becomes a 1. This causes a parity error reading it since the parity bit was generated for the intended value of 0. Once it flips it remains a 1.

This is not an error reading out the bit during destructive reading, since the error would go away on the next attempt to read it. The intended data value was 0 for that bit because the parity is generated for that case, but somehow the inhibit wire is not blocking the bit flipping on during the write part of the storage cycle. 

The way that core storage is designed is to select the X and Y rows for a given address, which would flip the bit to a 1 because the currents in X and Y combine to be large enough to flip the magnetization. If a current is sent down the inhibit wire in the opposite direction, it neutralizes some of that magnetic force and blocks the core from flipping. 

What we know is that the sum of X, Y and the reverse inhibit are strong enough to flip the bit whether inhibit is on or not. Most likely it is an issue with the inhibit driver or some setting, affecting only bit 0. I will have to do some scope tracing to figure out what is behind this issue and correct it.

I BEGAN DEOXIDIZING THE CONTACTS IN THE KEYBOARD

The keyboard of an IBM 1130 is the keyboard from inside an 029 keypunch, with a few different labels on keycaps. The encoding of a keypress is Hollerith code, as a consequence. The IBM 1130 peripherals do not translate their characters to a common encoding; each device has its own coding, forcing the programmer to make conversions. A letter on the keyboard comes out as Hollerith. Typing that on the console printer requires the issuance of the shift and rotate code of a Selectric typewriter (in the PTTC/8 rather than typewriter encoding). The programmer must do a table conversion of what is typed in to print it out. 

The keyboard is mainly mechanical in its encoding. Each keylever selects a combination of movable vanes on the rear of the keyboard. These open or close contacts on the side. In addition, thin metal bands below the keystem have contacts that can reshuffle the output of those contacts on the side. One final set of connections is altered when the Numeric key is held down, since one keycap can represent different characters when shifted. 

029 Keypunch keyboard repurposed as 1130 keyboard

Side contacts controlled by permutation mechanism

Numeric and keyboard restore buttons

Keypress detection switch
Key stem activation contacts

There are some electrical contacts in addition to the encoding role above - for example there is a microswitch for the Rest KB button that will restore the keyboard, removing any pressed keystroke.

The normal process for the keyboard is that a solenoid will reset the keys, thus 'unlocking' the keyboard. Any key that is pressed down will lock the encoding (permutation) mechanism and leave the key down. No other key can be pressed. A switch detects that a key is locked down and triggers an interrupt so that software can read the encoded value of the key. The act of reading the value also resets the KB Sel lamp. 

The software that manages the keyboard would typically immediately issue another Control command to select the keyboard to allow a next character to be pressed, as long as it is looking for input characters. Each Control command fires the solenoid to reset the keyboard so that it is ready for the next keypress.

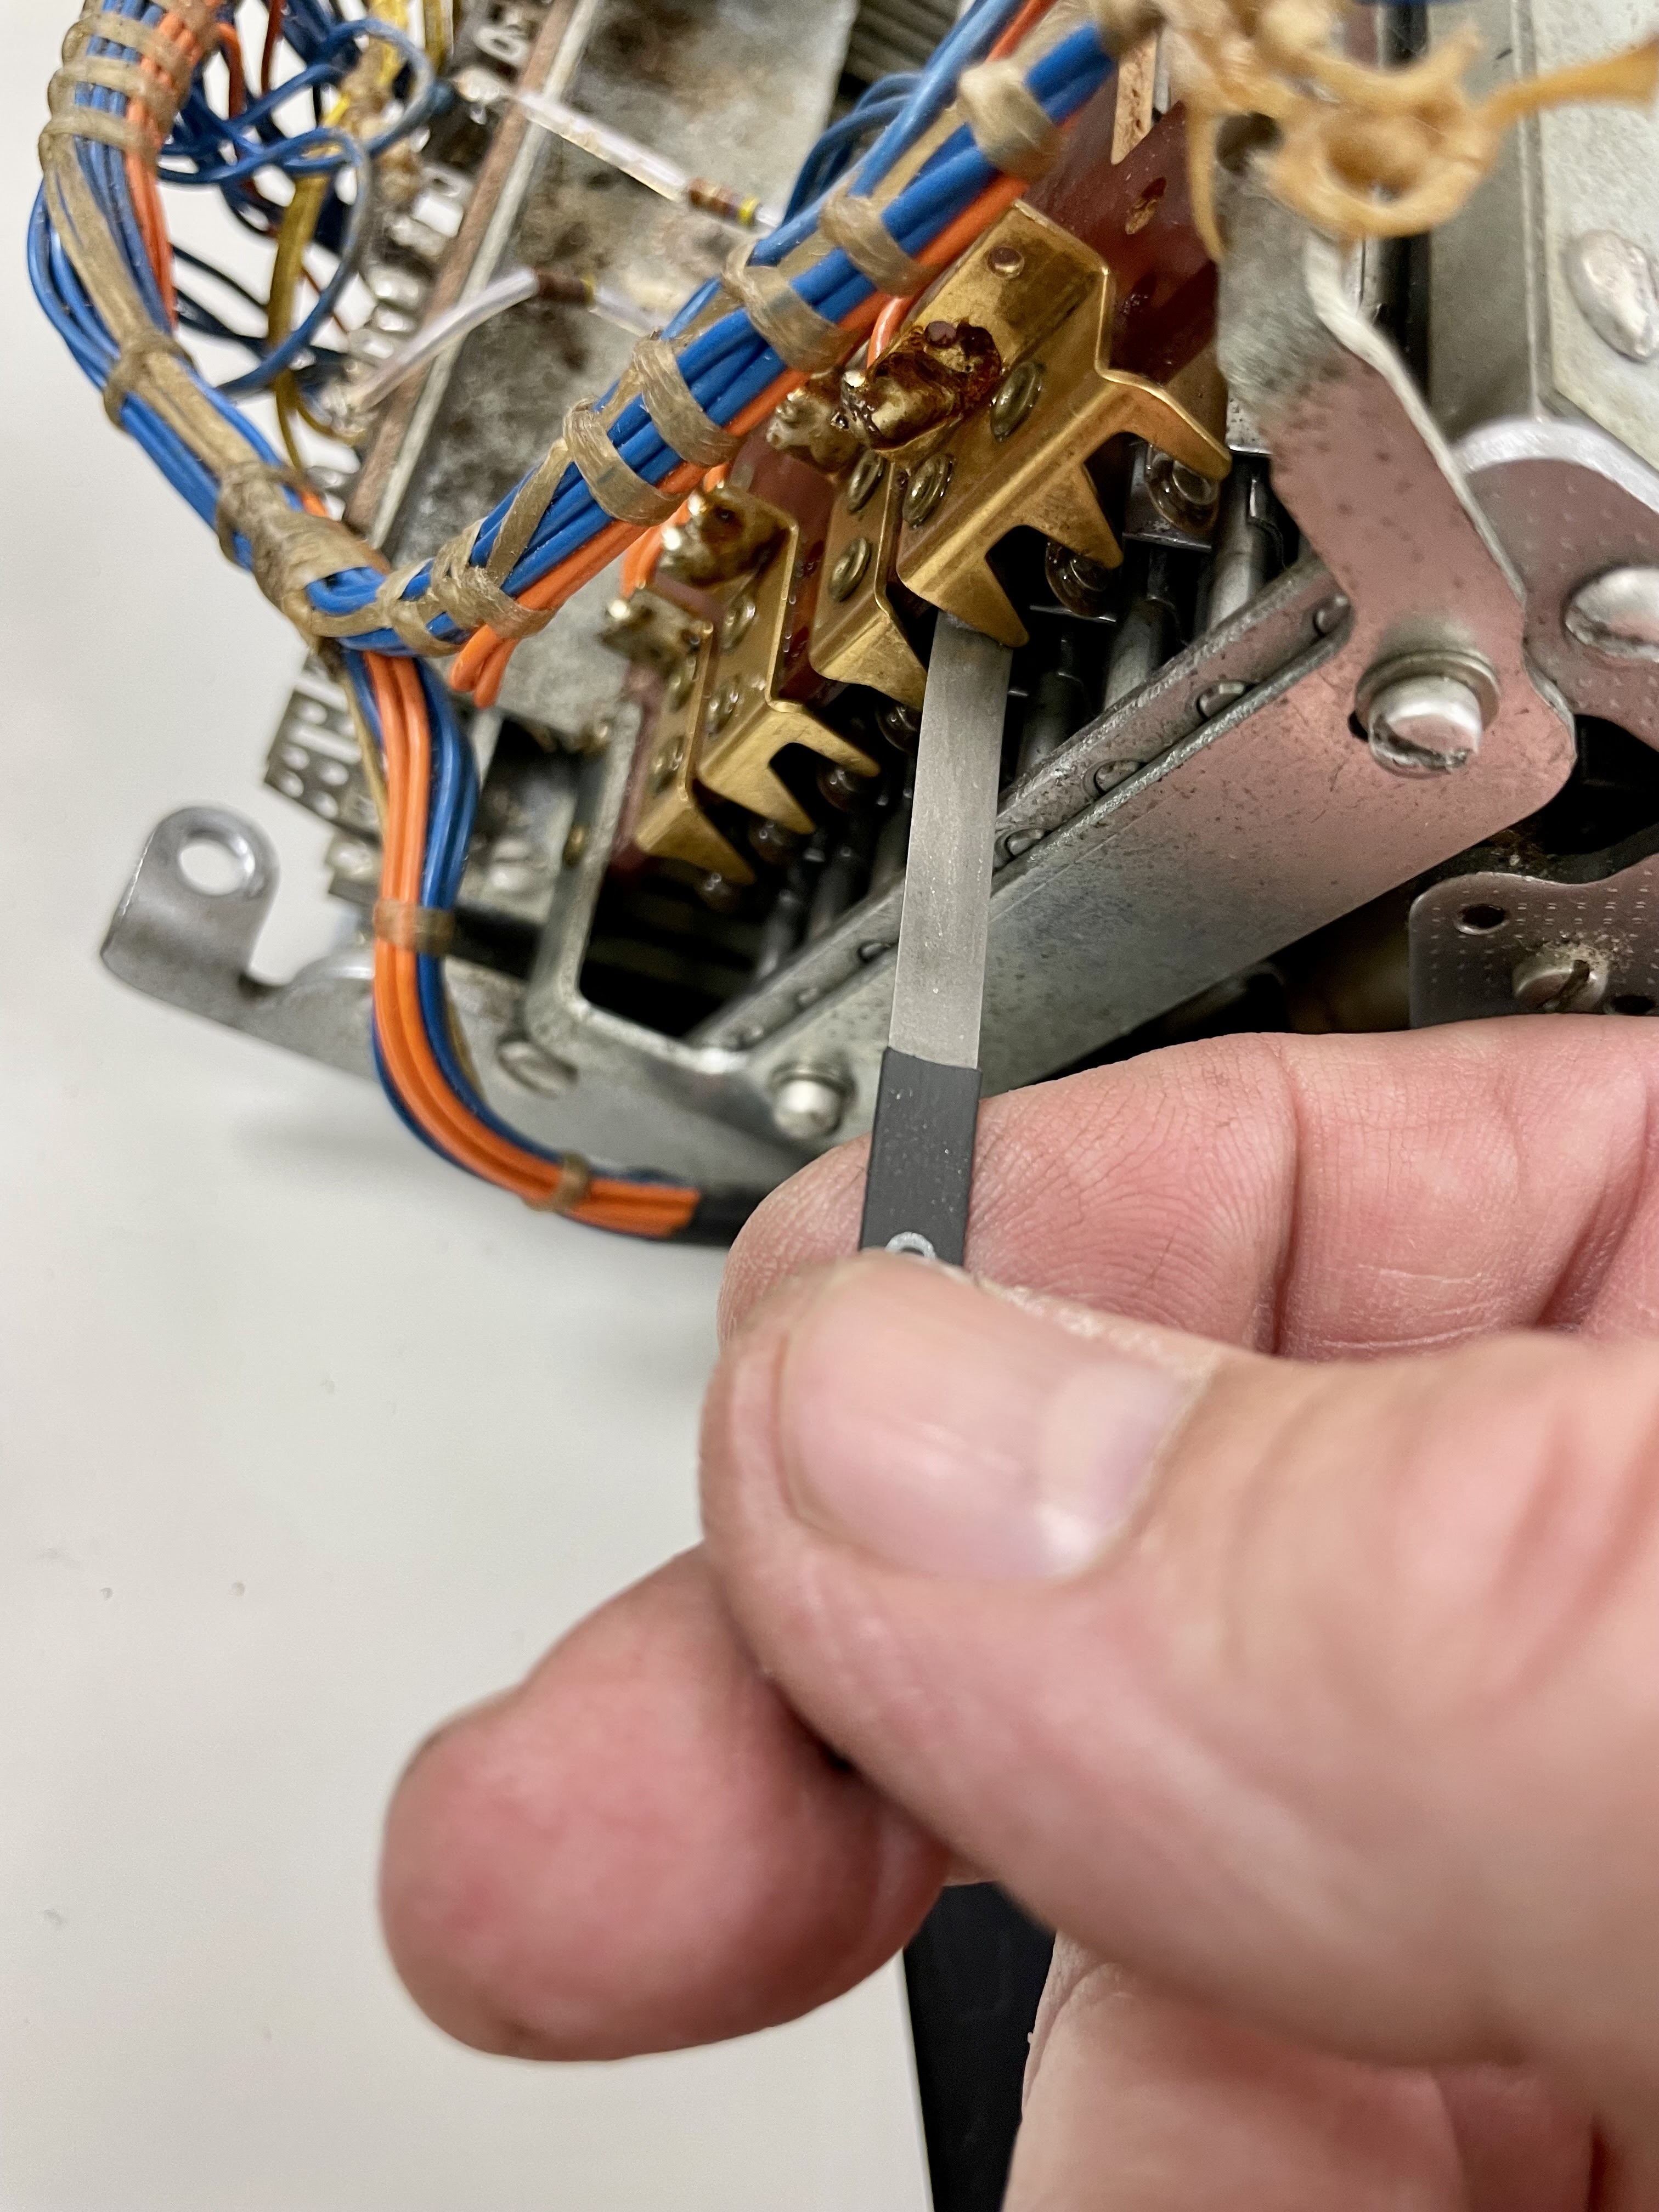
The contacts in the keyboard mechanism are prone to oxidation. I used a cleaner plus a burnishing tool, a thin blade just round enough to scrape off a thin layer of oxide without damaging the underlying metal. When I return to this task, I will use the continuity tester to verify good contacts and proper encoding.  

Burnishing contacts

LOCATION FOUND FOR THREE RELAY BOARDS TO ADD MEMORY LOADING TOOL

Hand entering instructions and data is a slow process, involving flipping the sixteen console entry toggle switches, pushing the Prog Start button and sometime loading new addresses and hitting the Load IAR button. To make entry of code more palatable, I designed a simple mechanism around some relay boards and an Arduino that will activate the console entry switches and virtually push the Prog Start and the Load IAR buttons. 

It has a very simple protocol that takes lines of four hex characters plus an initial code when this is an address rather than contents to be loaded. A program on a PC would talk to the Arduino over the USB cable and transmit long sequences of words to be toggled into core memory. 

This will be very helpful in debugging the machine, where portions of diagnostic programs can be loaded and run. Normally this would be done with multiple boxes of punched cards through the card reader or reading the programs from a disk cartridge, but this system has no reader and the disk drive is not yet working. 

While I designed the tool for The National Museum of Computing in the UK for use with their IBM 1130, I hadn't needed it on my system. TNMoC decided where to locate the relays and other parts, not me. 

The reason I didn't need it is an optional feature on my 1130 called the Storage Access Channel (SAC) that I connected to an FPGA based box that lets me directly write and read memory using a DMA-like function called cycle steal. This is much faster and more direct than toggling in code with entry switches and buttons, but neither the machine at TNMoC nor the one I am currently restoring have a SAC. 

Since I will install this tool, I have to make design choices for installation and wiring. I found a nice location under the table top, just behind the keyboard, where the relays can be mounted on drilled holes and neat wiring can connect them to the Prog Start button, Load IAR button, +12V supply, 16 console entry switches, and ground. Small cables will connect these to an Arduino and a power supply in a small project box placed near the CE switches inside the top cover. 


Friday, May 13, 2022

Have the Usage Meter running, repaired the rotary Mode switch, investigated the three lights that don't illuminate on display pedestal

SWITCH OPENED, FAULT FOUND AND REASSEMBLED

After disassembling the switch, I discovered that the fault was caused by a plastic piece that had split, leaving debris that was jamming the rotation. I realized that the two halves would work just fine as long as I cleaned out the bits.

Broken plastic piece near center

This switch has notches for ten stops in a 360 degree rotation, although it has a metal stop ring that only allows selection of seven of the ten possible positions. The shaft of the control is a flat bar, with the commutators of the switch gangs having a slot, as well as the plastic piece which had broken.

barrel and shaft

This plastic piece has holes drilled on opposite sides, small springs sit in the holes and press a small ball bearing into the notches in the switch barrel. When you apply rotary pressure the ball bearings push in against the spring, allow rotation, then pop out at the next notch which is one of the ten detents. 

The way it broke leaves it able to work properly

I put it back together, verified the electrical connections were correct for the seven detented positions, then reinstalled it on the switch plate I had been using with my 1130 replica. Later I will solder this back into the replica and put it into my display pedestal. 

Repaired switch back on plate

USAGE METER INSTALLATION AFTER SOME MODIFICATIONS

Some of the IBM rental plans involved extra charges when the computer was used more than the agreed number of hours per month. To support this, IBM put usage meters on the machines and would read them, much as a power utility reads the meter to bill for electricity. The pair of meters on a machine have a CE (customer engineer) keyswitch in between, so that during repairs or regular maintenance, the customer's meter did not run. Usage was instead accumulated under the CE meter. 

IBM made it difficult for customers to circumvent the usage meter. The meter controls are in a metal box which has a plastic tamper proof button isntalled. To open the box, the button is broken and a new one must be installed if IBM was the party opening it. Otherwise it was evidence of tampering. 

The power to the meters was routed down to join the terminals that supply system power to the main power supplies. If you removed those terminals, the meter wouldn't run but without the power rails, nothing else would run either. 

Inside the meter box, the transformer could be wired for 115, 208 or 230VAC operation, same as the main power supplies of the machine. Since this machine was originally a 115V unit, it had been converted for 230V. The prior restorers who did this conversion failed to detect the meter power supply and thus ran it at 230 while it was wired for 115. That damaged the windings of the transformer and it failed even after I rewired it for 230. 

I found a substitute transformer to produce 40VAC which is the supply used by the usage meters. It was a 115 to 40 transformer, thus I needed it to be connected to the 115V produced by stepdown transformer T2. That was a problem because of the security oriented wired, as the meter would be fed by the same line voltage as the power supplies, not by the output of transformer T2. 

Meter box with slightly larger substitute transformer

I had to break apart the terminals, cut back the unneeded wire from the meter and install a single wire terminal to feed the power supplies. I cut back the wires coming from the meter box, put terminals on them, and then hooked them to the main distribution terminal strip where T2 provides 115V. 

Severed wires ready for terminal lugs to be added

After verifying that the transformer in the meter box output 40VAC, I hooked it all up and tested the meter. When I put the CPU into a spin loop so the Run light would go on, the meter began accumulating fractions of an hour. It ceased moving when I stopped the CPU, exactly as the meter should behave. 

THREE LIGHTS WERE NOT LIGHTING ON THE PEDESTAL DISPLAY, DID SOME PROBING

I had noticed that bits 2 and 3 of the Storage Buffer Register display were not lighting, nor was the T2 light under the T-clock section. Hitting lamp test turned on bit 2 of the SBR but not the other two. 

At this point, it was possible that I had a component failure in the CPU that generates those bits, so I pulled the signal line off the pin of the display board and checked its output with a VOM. As I did this, I noticed that the signal line was already detached on bit 2, so I hooked that back up.

When there a 1 in bit 3, the signal line had 3V on it, exactly as it should. Similarly the T2 line had 3V when I single stepped the CPU to the T2 state. This tells me that the fault is on the display board or a bad incandescent lamp, not a defect in the 1130 itself. 

I left for the day but will investigate and repair the three lights in a future session. I am more interested in debugging the inability to Select the keyboard with an I/O instruction and will do some signal testing at the next work day.

Thursday, May 12, 2022

Still attempting to fix the backup 6213 Run card with its Reset key oscillations

SPOTTING +6V ON THE PULLUP RESISTOR CONNECTION TO THE AOI GATE

I probed around the entire circuit that generates the -DC Reset signals for the computer, hoping to spot some dynamic oddity that would hint at where the defect lies. This is implemented across three SLT modules plus a capacitor and resistor. And-Or-Invert module AOI, And Or Extender AOXb and High Performance Driver HPD modules. 

At the AOI module, I noticed that the voltage source for the output pullup, which should be +3V, was at +6V. This is the same as the adjacent pin which provides pullup for the diode logic side of the circuit.

AOI module from the card

The module has +6 connected for the left pullup resistor but should have +3 on pin 7 for the output pullup. I found +6 on this location. I initially suspected some kind of internal failure or short in the SLT module. I decided to replace it.

REMOVED DONOR AOI MODULE FROM A SPARE CARD, SWAPPED INTO 6213 CARD

I had a spare card from old ebay purchases, having a damaged connector but a few AOI modules on the card. I desoldered and removed the module from this donor board and from the 6213, then swapped the good one onto the board and soldered it into place. 

AOI removed from donor card

Suspected AOI removed from 6213 card

Substitute module soldered in place

PROBLEM PERSISTS - COULD BE CARD PCB TRACES OR NOT A REAL PROBLEM

The exact same symptoms exist - the oscillation at low levels of -DC Reset when the -Reset key is pressed. The voltage on pin 7 is also +6V. I removed the solder and tested to confirm that the two pads on the card are both connected together. 

I ran out of time but will continue to look at this from time to time, hoping to get to the bottom of the problem and repair the card. One test will be to see if these pins are also connected to +3 rail. If so, this is a short of some kind on the PCB of this card. If not, this may be an intentional distortion of the circuit for some engineering reason, thus not the cause of my symptoms. 

TESTING WORKING 6213 TO SEE IF THIS IS INTENTIONAL CONNECTION

I pulled the working 6213 card and put the VOM across the two pins. There is no connection like there is on the bad card. 

CHECKING CONNECTION BETWEEN +6 AND +3 ON CARD

The other possibility was a short on the PCB somewhere on the card that was connecting +3 and +6 together. That was very unlikely since all the other gates worked fine, but I had to test just for completeness. No issue here. Instead it appears the card was manufactured with this pin tied to +6 instead of the +3 it was designed for.

CUTTING CONNECTION AND ADDING JUMPER TO +3; NO RESOLUTION

I dug out the trace connecting the pin to +6 and instead soldered on a small jumper to a nearby source of +3V. I had hoped that would resolve the issue but when I tested, the oscillation is still there! At this point, all I can think of is a weak transistor probably in the AOXb module. 


While I have spare AOXb and HPD modules, so that I could continue swapping modules to fix this card, I am not sure it is the best use of my time right now. After all, this is a spare card, not needed because the primary card works fine. I will just add a marking to the card with the fault and save it for now.

DID A QUICK BENCH TEST OF THE 6212 CARD AND IT IS WORKING PROPERLY

The prior restorer had put out the backup 6213 card but also a 6212 card, one that handles some of the buttons, rotary mode signals and CE switches. It sits in gate B, compartment A1, at location B4. I don't see any indication that the original card is not working but decided to test the spare because it was easy to do with the test rig already set up.

All the debouncers worked properly and produced clean output signals. The card also has a number of single shot circuits to produce pulses at important times. I verified that all of these were triggering and giving a clean pulse. That card can go into the spares pile as a good backup. 


Assessing more of the functionality of the 1130 processor; looking good so far

CHECKING INSTRUCTION PREPARATION LOGIC

The IBM 1130 is built around core storage, thus instruction processing involves some number of storage cycles. Each storage cycle has a designation depending on its purpose in either preparing the instruction for execution or actually implementing the operation. 

The first fetch of a word for a new instruction is I1. This reads the word at the location pointed to by the Instruction Address Register (IAR) into the Storage Buffer Register (SBR) by transferring the IAR to the Storage Address Register (SAR) at the start of the cycle. 

IBM 1130 instructions can be short or long, that is they can take one or two words of memory. Bits in an word are numbered from left to right as 0 through 15. Bits 0, 1, 2, 3, and 4 are the op code for an instruction. Bit 5 set to 1 makes this a long instruction. 

For long instructions, the next storage cycle is I2, which fetches the next sequential word as the second part of the instruction. Generally this is the address that the instruction will use for its operand. 

The 1130 supports indirect addressing, indicated by bit 8 set on in the first word. This means that the contents of memory fetched in storage cycle I2 are an address that is then read in a further storage cycle IA to pick up the operand value. Long instructions that are not indirect use the contents of the second word, indirect instructions use the second word as an address and fetch from that address for the contents. 

Another addressing functionality of the 1130 is the use of index registers. If bits 6 and 7 are non-zero, they select index registers 1, 2 or 3 that are used to further modify the contents we picked up with cycles I1, I2 and IA. Short instructions use the next sequential address from the IAR as their content, long instructions use the content of the next sequential address from the IAR, and indirect instructions use the contents of the address picked up from the next sequential address from the IAR. 

The IX storage cycle grabs the value of the index register being used, if a non-zero value is in instruction bits 6 and 7. The 1130 stores the index registers in fixed locations in memory - locations 0001, 0002 and 0003 respectively. Thus we have a fetch of the contents of one of these three words during an IX cycle.

Finally, the contents selected by I1, I2 and IA cycles has the contents of the index register selected in IX added to it, the resulting value is the effective address or operand address. 

I wanted to check all the combinations of short, long, indirect and indexed addressing to be sure that the machine selected the proper storage cycles to take among the I1, I2, IA, and IX options. I checked that for each storage cycle it put the proper number in the SAR, e.g. for an index register 0001, 0002 or 0003 is put into the SAR at the start of that cycle. I validated that the computed effective address was correct.

CHECKING EXECUTION OF CERTAIN INSTRUCTIONS

When an instruction has been prepared, with the effective address determined and its operation code and flag bits saved, it is time to actually execute the instruction. This takes one or more execution cycles, E1, E2 and E3, with only certain input-output instructions requiring all three. 

The 1130 is a register oriented machine which means that instructions either act only on a register or act on a register and one storage location. The instructions that store a result use the execution cycle to place the appropriate value in the effective address in core. The instructions that use storage as one argument, for exampling adding a value from storage to the current value of a register, use the E cycle to fetch the data and then accomplish the function such as addition near the end of the storage cycle. 

I tested out load, addition, shift-rotate and conditional branch instructions to verify that they produced the proper output. This was not an exhaustive test of every instruction and every edge case per instruction, just a reasonable sample to assess how solid the processor logic appeared to be. 

Some instructions need more than the eight 450ns clock pulses per storage cycle that is standard in the machine. Therefore, when the T-clock advances from T0 to T7 it has to stay there and take additional T7 cycles until the task is complete. One example of this is shifting - bits are shifted one position per 450ns clock pulse thus for a longer shift we would need to stay in T7 until we were through. 

The counting for tasks like shifting, multiply and divide are done by a Cycle Control Counter (CCC) that has to reach 0 before we stop taking T7 and move on to T0 of the next storage cycle. This gets verified with the shift instruction tests.

Adding or subtracting in the 1130 requires multiple 450ns cycles to accomplish. The value of the operand fetched during E1 storage cycle is put in the Arithmetic Factor Register (AFR) and then the ACC and AFR do rounds of addition or subtraction (or logical AND, OR or XOR depending on the instruction) 

For each 450ns round, the corresponding bit positions of AFR and ACC are added, producing a result value in the ACC bit location and if there is a carry or borrow, it is put in the AFR bit position one to the left. I will use an example to illustrate this, with two values in the AFR and ACC then the result after a round of addition:

    AFR    0100 0011 0101 1011

    ACC    0000 0001 1000 0010

        after one round

    AFR    0000 0010 0000 0100

    ACC    0100 0010 1101 1001

        second round produces below results

    AFR    0000 0100 0000 0000

    ACC    0100 0000 1101 1101

        third round see below

    AFR    0000 0000 0000 0000

    ACC    0100 0100 1101 1101

Once the AFR is all zeroes, the machine stops taking additional T7 cycles and the addition is complete. We see that we added x435B to x0182 and produced the proper result x44DD but it took several rounds to handle all the carry situations. 

I verified that this worked properly, taking individual 450ns cycles (Single Step mode). I also checked that the Carry and Overflow indicators were set when they should be. 

The shift test involved rotation of bits out of the right end of ACC and into the left end of EXT. I also attempted some input-output to the keyboard and console entry switches.

OBSERVATIONS AFTER ALL THE TESTING

All of the instructions I issued, in all the addressing modes, worked properly. In fact, I discovered that my issue from yesterday where I thought the Rotate shift instruction wasn't moving bits to the EXT was in fact user error. I miscoded the instruction and had a simple shift right 10. When I did it correctly the machine worked properly.

Conditional branch instructions, arithmetic, whatever I threw at the machine seemed to work properly. In all my testing today I was only able to discover two items that need work. One was inability to read from the keyboard and the other was sporadic parity errors. 

Issuing a Control command via the XIO (execute IO) instruction should trigger the solenoid to unlock the keyboard for input, but it didn't respond. I was able to successfully read the 16 toggle switches of the Console Entry Switch, so this is something specific to the keyboard and its controller cards. 

The parity errors crop up on reading a word, in most cases it was bit 0, the high bit, that came on when it should have been 0. The machine will run fine with the Storage Display CE switch, but sometimes when executing instructions I see the parity error. Once it reports the error the word is indeed corrupted in storage as it trips repeatedly at that location. 


REPLACED ROTARY MODE SWITCH TEMPORARILY, NEED TO LUBRICATE IT

The rotary mode switch gets a lot of use when sitting at the machine testing - selecting various single step, single storage cycle or single instruction, loading and displaying, then normal Run mode are frequent actions. 

The switch was very crunchy and hard to turn. From time to time it would jam up and need some persuasion to rotate again. I suspect that the bearings are gummed up or damaged, however there is no lubrication opening. 

I happened to own a real 1130 rotary mode switch, something I had built into my IBM 1130 replica computer. I grabbed that and soldered it in place of the bad switch. This let me continue with my debugging but ultimately I will either disassemble and repair the bad switch or find a different replacement for it.  

Swapping rotary switches


Wednesday, May 11, 2022

Power sequencing fixed, traced down the root cause of the machines bad behavior, majority of it is working properly

POWER SEQUENCING WIRING CORRECTED AND SYSTEM BROUGHT UP

After some careful tracing and reconnecting of leads, the power sequence logic is solid and correct. I flipped on machine power and it came up to the state it had been in when the last restorer had to give up. Except for when it is in Single Step mode, the Run light goes on and it won't stop even with Imm Stop or Reset buttons. 

CE functions like Stor Disp or Stor Load can't be used because the machine has to be stopped for them to work. Further, even in Single Step mode it didn't allow me to step through the T-clock states and try instruction execution. 

TRACING THE CAUSE OF THE MACHINE'S INITIAL CONDITION

Because I had fully tested the run state card (6213) already, I was confident that the problem would be due to bad input(s) to the card and not a defect inside it. Debugging would be a matter of inspecting signals two at a time on my two channel oscilloscope.

Turning on the Run state is done by a pair of flipflops that are triggered by events like the Prog Start button or interrupts. These are Advance and Delay. The output of Delay was oscillating which would indeed keep triggering the Run flipflop even when conditions existing that would rapidly turn it off - such as the Imm Stop key. 

I walked through the signals that might be driving Delay, such as the Prog Start key signals or interrupt, but didn't see anything in the wrong state. Certainly nothing oscillating. 

As a quick aside I have to mention a technique IBM used extensively in their computers from the 1950s and 1960s. Every logic gate, even every transistor, was a relatively high cost item to them and they worked hard to drive out superfluous components. This manifested itself in the use of wired-OR gates.

When several signals were combined through an OR gate in some design, they could be implemented with open collector transistors, all tied together to the same output point, with just one pullup resistor for the output. If all the signals were high, the result was high, but any low signal would pull the whole output down to low. 

Yes, that is the definition of AND logic - output is high only when all inputs are high. IBM also calls these wired-AND gates. Essentially the mirror of that is a NOR gate with all the inputs inverted - any signal low will cause the NOR to output low.

The Delay flipflop signal that was oscillating was in a dot-OR with a signal coming from off the card. This signal, -Prog Load T7 Ph B, should only dip low when the machine is doing a Program Load (boot). Since it also requires it to be T-clock state T7 and clock Phase B, the period Phase B clock was producing the oscillating signal we saw. 

I moved over to the section of the machine that control Program Load and generates the -Prog Load T7 Ph B signal. There I put the oscilloscope on the three inputs to the NAND gate that generates our signal. +T7 was high, +Phase B was oscillating but +Program Load was at an invalid voltage of about .5, high enough to appear high to the gate thus we were sending out the signal

Looking at the source for +Program Load lead me to another card. It was in gate A, compartment C1 whereas the prior cards were in gate B, compartment A1. Here on the card, +Program Load was a valid near zero low state, but on the other gate it was different and invalid.

The way the signal gets from one compartment to another, including to different gates, is over ribbon cables. These plug into the backplane around the edges, in columns A and N as well as rows 1 and 8. The ALD page will describe the location and pin for a signal that is leaving or entering a compartment. 

Ribbon cables plugging into right edge of compartment

Ribbon cables neatly folded and routed

Thus, the signal for +Program Load is generated on a card and output on a pin to the backplane. That signal will travel on a trace or via wire wrap connections over to one of the edge slots where the cable plugs in. The signal travels over the cable to the other compartment where it is plugged into that compartment's backplane. Again, it has to travel by traces or wire wrap over to a pin for the card slot with the destination card that needs this signal. 

First step was to use the continuity tester to verify that the pin on the source card and the pin on the destination card were electrically connected. Problem found! No circuit existing for the +Program Load to make to to the NAND gate which therefore was pumping out spurious signals due to a floating invalid input. 

Open circuit where connection should exist

I checked the seating of the connectors for the cable, then began testing each link to figure out where connectivity was lost. The destination pin was connected to the cable pin D06 in slot A6. The signal patch from slot A6 in gate B to slot N4 pin D06 in gate A was good. The link from N4 D06 to the card pin where the signal was generated . . . open circuit. 

I inspected visually. No sign of wire wrap on either pin, so this was a backplane trace that is somehow disrupted. With no obvious sign of trauma, the reason for the failure is obscure. Sometimes these backplanes are flexed too much by pressure put on card when seating or removing them, leading to hairline cracks. It can also be material failure of the bond of a trace to a pin. 

WORRISOME OMEN

Where one failed trace exists, others may too. I will proceed in debugging for a while but if I encounter additional failures of signals on this backplane, I may have to laboriously verify every single connection.

This compartment is responsible for the device controllers for the selectric console typewriter, the keyboard, some pushbuttons on the console, the disk drive and some miscellaneous tasks such as Program Load. I may not find these failures until much later in the restoration, once the processor itself is free of errors and peripherals are being tested. 

JUMPER IN PLACE, MACHINE BEHAVES WELL

I put a jumper to complete the circuit, powered up and the symptoms were gone. The machine now sits in a stopped state and responds properly to the mode switch, pushbuttons and CE switches. I used the Stor Disp (storage display) switch to cause the machine to loop through storage reading every location. 

Jumper completes the circuit

Initially I hit a word with a parity error, but after doing a Stor Load (storage load) to force every word to zeroes, a scan of all memory worked fine. I also loaded all ones just to check that it can write back both 0 and 1 values. Also good. 

I loaded a couple of instructions into memory - Load the accumulator with location 3, add location 4 to the accumulator, then loop back to repeat the add infinitely many times. Location 3 had zero and location 4 was 0001. 

Single stepping showed me that the machine was able to handle instruction execution - read the word that the Instruction Address Register points at, move the upper bits into the op code and flag registers, calculate the effective address for location 3, load the data from location 3, then shift it from memory into the accumulator (ACC). 

The next instruction also triggered addition, which I watched work successfully. Even more reassuring was the execution of the branch instruction. I used a short form MDX which has a relative displacement from the current IAR. That is, if the MDX is in location 2, the IAR will be set to 3 when the MDX starts executing. My MDX had a displacement value of xFE, which is negative 2, so it had to add -2 to the IAR value to compute the target location of the branch.

IBM 1130 addition is an iterative process. The value being added is in the Arithmetic Factor Register (AFR) and it is added to the ACC bitwise. The result of the add is in the ACC but any carry is saved in the AFR. As long as the AFR is non-zero, we have to do the addition of AFR with ACC again. This can take up to 15 cycles in the worse case. The machine has to repeat that T7 clock state until the AFR becomes zero, something I watched. 

This proved out the logic to extend a cycle by staying in T7 multiple times. It proved the adder circuitry was sufficiently sound to handle the addition. I also saw that the machine logic to step through multiple storage cycles while executing, states such as I1 (instruction 1) and E1 (Execution 1) were correctly set. 

I put the machine into normal mode and hit the Program Start key, where it began the incrementing of the ACC but then we encountered a Parity Error and it stopped. This would happen sporadically. My guess is that the core memory circuits need some adjustment to make them more reliable. However, it could be flaky signals due to bad backplane traces instead.

I entered a few other instructions, including a Rotate ACC and EXT to shift the contents of the ACC rightward into the EXT and to take bits falling out of the bottom of the EXT and place that in the vacated top of ACC. I saw the bits in ACC shift out but they never reached the EXT. This did prove the cycle control logic that counts for variable length shifts was working properly.

The bottom line is that the machine has a significant majority of its functions working properly, but a few things don't work correctly or as reliably as they should. A very good start to a restoration, indicating that we did not have widespread damage from a catastrophic power event as I had feared earlier.