CHECKING AND ADJUSTING SINGLE SHOT TIMERS FIRST
The controller logic for the 1053 is oriented around a pair of single shots - timers that emit a single pulse of a fixed duration when activated. They are intended to last 25 milliseconds each. The selection solenoids are activated during the first 25 millisecond interval and not active during the second 25 millisecond interval. The logic waits to get the feedback from the -CB Response and +TWR Interlock wires from all the switches in the typewriter, keeping on an interlock latch until the feedback shows we are done before ending the print cycle and giving status to the CPU.
I put the oscilloscope on the test point and turned some potentiometers until the timers were 24 ms long as they fired, based on the numbers in the IBM 1130 FE Maintenance Manual. This ensures that the solenoids are powered for the right amount of the cycle and removed after the selection has been locked into the typeball by the detent.
 |
| Probes to watch the SS duration |
 |
| Adjustments for single shot card |
 |
| Single shot outputs |
INTELLIGENTLY SETTING THE PRINT CYCLE SWITCH
The issue that causes problems with continuous print cycles is that the solenoids are moving the tilt and rotate mechanism while the ball is still locked at its current position. The make timing of the contact for print cycles was moved forward until the point where the ball detent was completely removed. The ball is then free to swing to whatever tilt or rotation position it wants even though it is pivoting back to its rest position.
 |
| Unit out and ready for adjustment |
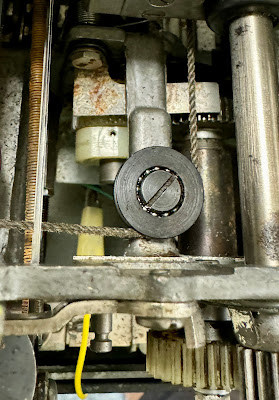
I had several points of reference, including the position of the bails moving up and down at the time the switch should close, the condition of the detent on the typeball when it is safe to start selecting new rotate/tilt positions and the degree wheel markings. I was quite confident by the end that I have the print cycle feedback adjusted exactly right.
 |
| Print cycle feedback switch with cam |
 |
| Top with setscrew visible |
HAND LOOP RESULTS WITH CONTINUOUS STREAMS
I used a very tight hand loop to fire off 1053 commands as rapidly as it would report completion of the prior action. I chose a number of worst case situations, such as adjacent characters at the extremes of rotation (-5 and +5), adjacent characters at the extremes of tilt (0 and 3), and quite a few combinations I threw at it.
The typewriter performed brilliantly, the print quality is excellent and I am only waiting to run the KB/1053 diagnostic as a kind of formal signoff but have no doubt the console printer will ace any test thrown at it.
 |
| Good output |
STILL FIGHTING TO GET THE DIAGNOSTIC TO RUN AGAIN
After time single stepping through instructions and poring over the program code, I see what has happened. When I prepared this memory image, I set bit switch 15 on which tells the diagnostic monitor to load the next test (304 - the KB/1053 diagnostic) but halt it initially. This was used so that options could be set before starting the diagnostic.
Indeed the code was loaded and the entry is properly set up in the tables inside the diagnostic monitor. The problem is that the monitor will start a halted program only once - when it first sees a restart with the halted diagnostic - but after that it considers that the diagnostic completed successfully and will never run it again. There seems to be no way to ask the monitor to run it again.
I am still waiting for the update to the simulator which will give me the use of the Console/Keyboard switch allowing me to build a memory load that I am able to prove will work by running it on the simulator. I see the execution of this program as only a formality.
No comments:
Post a Comment